Remote collaboration
Overview
Teaching: 45 min
Exercises: 45 minQuestions
How to create a DataLad dataset collaboratively?
How to publish a DataLad dataset?
How to consume a DataLad dataset?
Objectives
Exercise publishing and consuming data
Demonstrate the dissociation between a dataset and its contents
Prerequisites
GIN (G-Node Infrastructure) platform will be used for dataset publication. In order to fully complete the exercises, you will need a GIN account. The sign-up requires only a username, password, and a valid e-mail address (institutional e-mails are recommended to benefit from the full set of features).
Introduction
In the first module we covered the basics of local version control. We learned how to record changes that were made, and how to interact with the dataset history. We built a small dataset, with a record of operations which led to its current state. All these operations were done in a single location and by a single person.
However, research data rarely lives just on a single computer, and research projects aren’t single-person affairs. You may want to synchronise your data to a remote location for backup or archival. Having a remote storage, you may want to keep only a selection of files on your computer to save space (but also frequently rotate the files you have locally). You may want to use this storage to send data to your colleagues, and rely on version control to ensure that they are up to date. You may also want them to contribute to your dataset by adding new data or making some changes, which will be tracked. Finally, you may want to publish the dataset to some kind of a repository.
DataLad has tools to facilitate all these operations. In this module we will cover the basics of collaborative and remote work with datasets. We will start by publishing the dataset created during the first module. As a platform of our choice we will use GIN (G-Node Infrastructure).
We chose GIN because it provides a convenient way of hosting DataLad datasets. That being said, DataLad integrates with many providers and supports different scenarios – including those when hosting of dataset information and actual data is separated into two locations. Although each scenario will be slightly different, the setup steps that we will cover with GIN will look similar on other git-based hosting solutions.
Prelude: file availability, getting and dropping content
Before we proceed to data publishing let’s first take a look at the
dataset we created during the first module. We used two ways of adding
image files: some were downloaded, placed in the dataset “manually”,
while others were included using datalad download-url. We noted that
the latter records the file origin in a way that is not only
accessible to us, but also usable by DataLad. Let’s use this
information now.
The datalad drop command is used to drop file content from
datasets. It does not remove the file entirely - the information about
its presence and all associated history are maintained - it removes
the file content to save space, and only does so if the file can be
reobtained. Let’s use it on one of the files we got through
download-url.
Change the working directory to the dataset root (the folder which we
called my-dataset when the dataset was created) and then do:
datalad drop inputs/images/chinstrap_02.jpg
drop(ok): /home/alice/Documents/rdm-workshop/my-dataset/inputs/images/chinstrap_02.jpg
What are the results? The file is still visible (you can list files
with ls inputs/images or check the directory in your file browser),
but has no contents: you can try opening it (from your file browser or
with xdg-open if you’re on Linux) but this yields an error.
You can verify that this has freed up disk space by typing:
datalad status --annex all
5 annex'd files (5.4 MB/6.3 MB present/total size)
nothing to save, working tree clean
Let’s try dropping the file which we put in the dataset manually
(i.e. using wget and not datalad download-url):
datalad drop inputs/images/chinstrap_01.jpg
drop(error): /home/alice/Documents/rdm-workshop/example-dataset/inputs/images/chinstrap_01.jpg (file)
[unsafe; Could only verify the existence of 0 out of 1 necessary copy; (Use --reckless availability to override this check, or adjust numcopies.)]

# If you were to run this with DataLad version < 0.16.0, the safety check would be overridden with --nocheck instead of --reckless availability)
This time, DataLad refused to drop the file, because no information about its availability elsewhere has been recorded. The extra episode on removing files and datasets has a bit more context about this behavior.
The datalad get command is the reverse of datalad drop - it
obtains file contents from a known source. Let’s use it to reobtain
the previously dropped file:
datalad get inputs/images/chinstrap_02.jpg
get(ok): inputs/images/chinstrap_02.jpg (file) [from web...]
The output shows that it was reobtained from the stored URL. You can now verify that the file has its contents and can be opened again.
The datalad get / drop mechanism is used often. Soon, we will
demonstrate it in action with datasets downloaded from external
sources. However, you can already imagine its potential use cases. If
you have a dataset with many large files and a backup location, you
can use it to keep only part of its contents on your local machine
(e.g. laptop) while being aware of the bigger whole. With that in
mind, let’s move on to dataset publishing.
Publishing datasets to GIN
GIN (G-Node infrastructure) is a free data management system designed for comprehensive and reproducible management of scientific data. It is a web-based repository store and provides fine-grained access control to share data. GIN builds up on Git and git-annex, and is an easy alternative to other third-party services to host and share your DataLad datasets. It allows sharing datasets and their contents with selected collaborators or making them publicly and anonymously available. And even if you prefer to expose and share your datasets via GitHub, you can still use Gin to host your data.
Configuration (SSH keys)
To participate in the following part you should have registered an account on GIN. Before we are able to start sending data, we need to configure our access. This will require a little bit of explanation.
The data transfer to and from GIN (and other git-based platforms, such as GitHub or GitLab) can be done based on two protocols, https (the same as used by web browsers to access websites) and ssh (typically used for command line access to remote computers). The https access uses a combination of user name and password for authentication. For GIN, it cannot be used to transfer annexed file content. For this reason, we will prefer the ssh protocol. The authentication is based on SSH keys - pairs of text files with seemingly random content, called a private and public key. The public key is shared with a server, while the private one is kept on a local computer. They are generated so that it is easy to verify ownership of one based on the other, but virtually impossible to forge it.
Note on Binder (no ssh)
If you are working from the DataLad Binder, you will not be able to use the ssh protocol, as it is disabled. You can skip the key generation part, and replace all URLs below with their https counterparts (i.e.
https://gin.g-node.org/instead ofgit@gin.g-node.org:/). This will not allow you to transfer the annexed files content, but at least you will be able to transfer file information and non-annexed text files.
To generate the SSH keys, we will follow the GitHub guides on checking for existing and generating new keys. The summary below applies to Linux.
You may already have an SSH key and may want to use it. To check for
existing keys, enter ls -al ~/.ssh to check the contents of the
folder where they are typically stored. By default, a public key file
would be named id_rsa.pub, id_ecdsa.pub or id_ed25519.pub (the
names refer to the algorithms used to generate key pairs). If you
don’t see such files, or the ~/.ssh folder does not exist, you will
need to generate a new pair.
To generate, use the following command (replacing the placeholder with the e-mail used to register on GIN):
ssh-keygen -t ed25519 -C "your_email@example.com"
When prompted, accept the default location and choose a password to protect the key. You may use no password by accepting an empty one. However, especially on a shared machine, setting a password is recommended, because it guarantees that a person who gets hold of the key cannot use it without knowing the password.
Then, you can add the key to the ssh-agent, a helper program running
in the background. First, start the agent if necessary with eval
"$(ssh-agent -s)" and add the key with ssh-add ~/.ssh/id_ed25519
(if you chose a different name or location, use it instead).
Finally, you can add the public key to GIN. Log in to the web
interface, go to settings (click on your avatar in upper right and
choose “Your Settings”), then select SSH keys in the menu on the left,
and click “Add Key”. This will open a form with two fields. In “Key
Name”, enter something that you will recognise (eg. “Work laptop” or
“RDM workshop hub”). In “Content”, paste the content of the public key
file. To get it, you can display the file and copy its content, or do
it with a single command: pbcopy < ~/.ssh/id_ed25519.pub. After
pasting the key, click the “Add key” button.
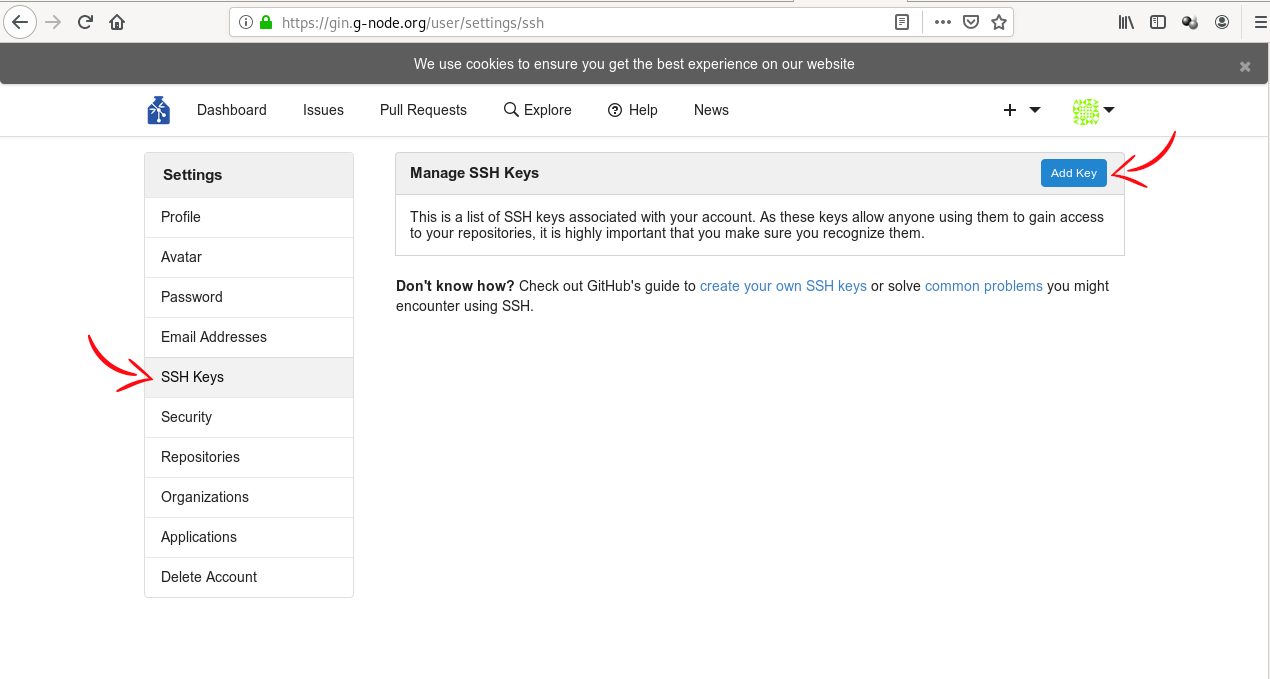
(Image from DataLad Handbook)
Publishing to GIN (datalad push)
Create an empty repository on GIN
We have our dataset, we configured our access, and we are ready to
publish. To do so, we first need to create a repository - a place on
GIN where things will be stored.
This can either be done via GIN’s web interface, or, when you run DataLad version
0.16 or higher, via the create-sibling-gin command.
Pick whichever route seems more attractive to you.
Route 1: Create a repo via web interface
Go to gin.g-node.org. Click the plus button on the upper right and select “New Repository”. Then, enter a repository name (one word, no spaces, but dashes and underscores are allowed). You can, optionally, add a short description in “Title”. In the “Initial files” section, uncheck the “Initialize this repository with selected files and template” checkbox - we want the repository to be empty. Finally, click the button “Create Repository”.
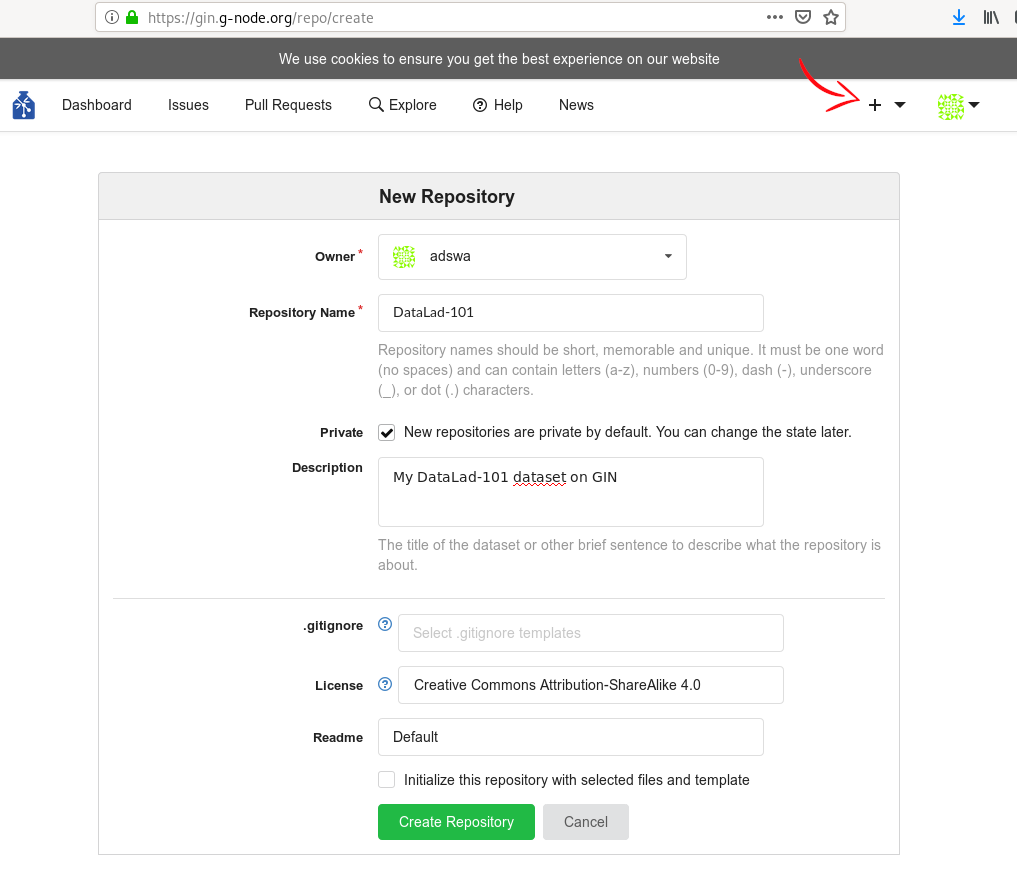
(Image from DataLad Handbook)
Afterwards, add the GIN repository as a
sibling of your dataset. To do so, use datalad siblings add,
substituting your user name and dataset name below (note that the URL
is displayed for you on the GIN website after creating the
repository). Note that since this is the first time you will be
connecting to the GIN server via SSH, you will likely be asked to
confirm to connect. This is a safety measure, and you can type “yes”
to continue.
datalad siblings add \
    --dataset . \
    --name gin \
    --url git@gin.g-node.org:/username/dataset-name.git
[INFO   ] Could not enable annex remote gin. This is expected if gin is a pure Git remote, or happens if it is not accessible.
[WARNING] Could not detect whether gin carries an annex. If gin is a pure Git remote, this is expected.
.: gin(-) [git@gin.g-node.org:/username/rdm-workshop.git (git)]
The command took three arguments, dataset (which dataset is being
configured, . means “here”), name is the name by which we will
later refer to the sibling, and url is the address for transferring
the data.
Route 2: Create a repo using create-sibling-gin
The create-sibling-gin command automates repository creation from the command line for Gin.
You can provide it with a name for your sibling (-s/--name gin) and a name under which the
repository will be created (make sure that no repository with this name exists yet).
datalad create-sibling-gin --name gin my-dataset
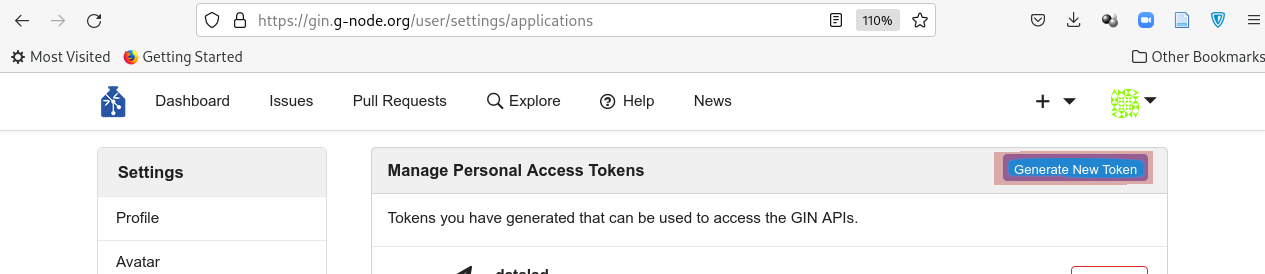
If it is your first time running this command, DataLad will ask for a token. This token provides authentication and permission to create new repositories under your user account.
An access token is required for https://gin.g-node.org. Visit https://gin.g-node.org/user/settings/applications to create a token
token:
The link above should take you to your accounts’ settings, where you will be able to click “Generate new token”:
Choose a meaningful and unique name:
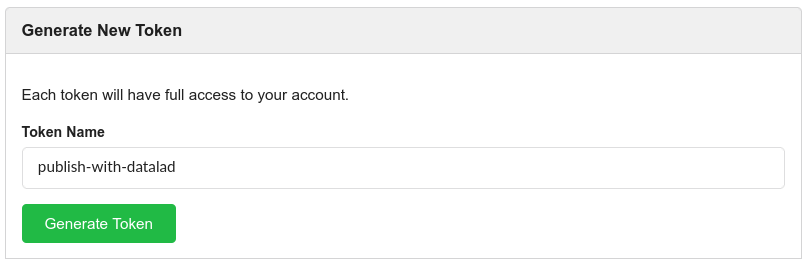
And copy the token into the command line prompt. DataLad will store the token in your system’s password manager, but it can be useful to make a note of the token if you are not using your personal computer to run this code.

 datalad create-sibling-gin -s gin mydataset
An access token is required for https://gin.g-node.org. Visit https://gin.g-node.org/user/settings/applications to create a token
token:
create_sibling_gin(ok): [sibling repository 'gin' created at https://gin.g-node.org/adswa/mydataset]
configure-sibling(ok): . (sibling)
action summary:
  configure-sibling (ok: 1)
  create_sibling_gin (ok: 1)
Afterwards, there will be a new repository on Gin and your dataset will know it as a sibling under the name gin.
If it is the first time connecting to Gin, you might be prompted to approve the connection to a new host.
datalad siblings
The authenticity of host 'gin.g-node.org (141.84.41.219)' can't be established.
ED25519 key fingerprint is SHA256:z+QGH+2gmb07ZpjRxRKW+Msge5PDR8O+y1p6qQR54qg.
This key is not known by any other names
Are you sure you want to continue connecting (yes/no/[fingerprint])? yes
.: here(+) [git]
[WARNING] Could not detect whether gin carries an annex. If gin is a pure Git remote, this is expected.
.: gin(-) [https://gin.g-node.org/adswa/mydataset (git)]
Alternatively, run git remote -v to list known siblings:
git remote -v
gin     https://gin.g-node.org/adswa/mydataset (fetch)
gin     git@gin.g-node.org:/adswa/mydataset.git (push)
Publish your dataset
If you have created a new repository on Gin and registered it as a sibling of
your dataset via one of two routes outlined above, you can publish your
dataset with datalad push, using the sibling name together with the --to
option:
datalad push --to gin
datalad push --to gin
copy(ok): inputs/images/chinstrap_01.jpg (file) [to gin...]
copy(ok): inputs/images/chinstrap_02.jpg (file) [to gin...]
copy(ok): inputs/images/king_01.jpg (file) [to gin...]
copy(ok): outputs/images_greyscale/chinstrap_01_grey.jpg (file) [to gin...]
copy(ok): outputs/images_greyscale/chinstrap_02_grey.jpg (file) [to gin...]
publish(ok): . (dataset) [refs/heads/git-annex->gin:refs/heads/git-annex 80ef82a..af7d450]
publish(ok): . (dataset) [refs/heads/main->gin:refs/heads/main [new branch]]
action summary:
  copy (ok: 5)
  publish (ok: 2)
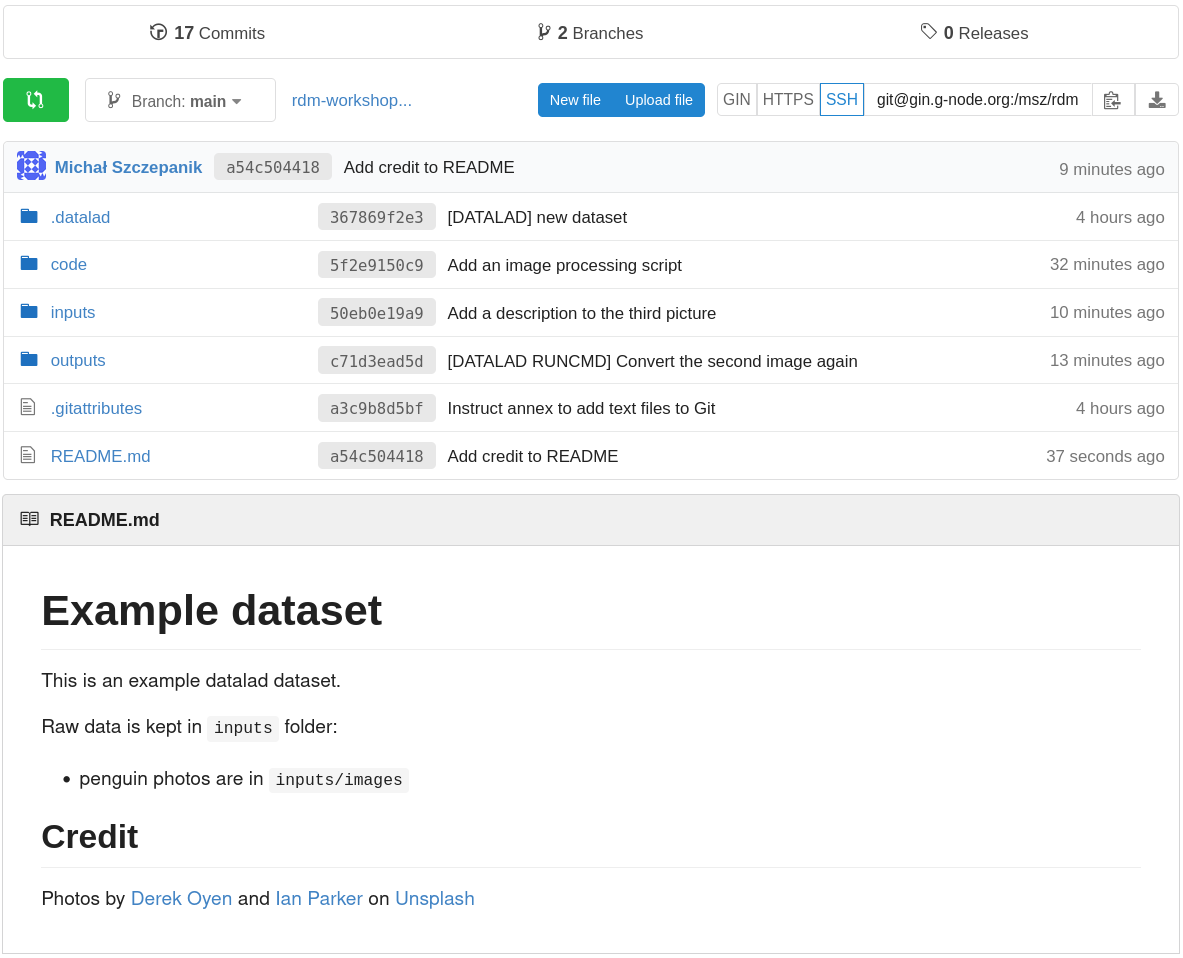
If you now refresh the GIN website, you will find all of your dataset there (note: if the file names look cryptic and you see “Branch: git-annex” above the files, pick another branch, likely called “main”; to make this choice permanent, you can go to repository “Settings”, pick “Branches”, and select a default branch – this is dependent on your git configuration). Observe, that:
- the README is displayed under the list of files,
- you can click on files to view their content.
Finally, going back to the command line, you can use the datalad
siblings command to report all known dataset siblings. In this case
there are two: one called here (obviously) and one called gin (the
one we added). The (+) symbols mean that both store annexed content:
datalad
siblings
.: here(+) [git]
.: gin(+) [git@gin.g-node.org:/username/rdm-workshop.git (git)]
Data consumption: datalad clone
With the dataset published, we can now switch our perspective to that of a data consumer. Obtaining a copy of a dataset is called cloning. To try it out, let’s change our working directory outside the dataset. Assuming we’ve been at the dataset root, we can navigate to its parent directory:
cd ..
Then, we can clone the dataset using the SSH URL (the same which we
used to publish the data). For your convenience, the URL is displayed
above the file list on GIN. Let’s name the cloned dataset
cloned-dataset to distinguish it from the original (by default,
the datalad clone command uses the name of the repository):
datalad clone git@gin.g-node.org:/username/dataset-name.git cloned-dataset
install(ok): /home/alice/Documents/rdm-warmup/cloned-dataset (dataset)
Note. By default, repositories on GIN are created as private, meaning that they are accessible only to their owner and, potentially, other users who were explicitly granted that access. A repository can also be made public, meaning that it’s accessible (for download) to anybody. Here, we are cloning our own repository, so we can access it freely regardless of settings.
Let’s look inside.
cd cloned-dataset
- First, we can see that the history is present (
tig). - We can list (
ls) the files. - We can view (e.g.
cat README.md) the content of text files (reminder: when creating the dataset we configured them not to be annexed). - We cannot view the content of the annexed image files (linux:
xdg-open
inputs/images/...).
That’s because clone operation does not download the annexed
content. In other words, for annexed files it only retrieves file
information (which can be very convenient - we can see what’s in the
dataset and then selectively download only the content we need). We
can confirm that this is the case by asking about the annex status:
datalad status --annex all
5 annex'd files (0.0 B/6.3 MB present/total size)
nothing to save, working tree clean
We have already encountered the get command, and here we will use it
again. First, however, let’s take a look at the output of another
command to see what DataLad knows about file availability:
git annex whereis inputs/images/chinstrap_02.jpg (3 copies)
whereis inputs/images/chinstrap_02.jpg (3 copies)
  	00000000-0000-0000-0000-000000000001 -- web
   	7775655c-b59d-4e58-938c-698d2205d46a -- git@8242caf9acd8:/data/repos/msz/rdm-workshop.git [origin]
   	b228d597-3217-45a5-9831-6f10f00a1611 -- My example dataset

  web: https://unsplash.com/photos/8PxCm4HsPX8/download?force=true
ok
This is one of the files originally added through datalad
download-url, and this information was preserved - the first line lists
“web” as source, and the exact link is shown at the bottom. Next,
there is a line labeled “origin”, which means the location from which
the dataset was cloned. And finally, there is the current dataset.
With this knowledge, let’s get the file content:
datalad get inputs/images/chinstrap_02.jpg
get(ok): inputs/images/chinstrap_02.jpg (file) [from origin...]
Now we can verify that the file content is present by opening it. Success!
Update the dataset
Let’s imagine a situation when there’s an update to a dataset’s content: either a new file is added, or a change is made to an existing one. In both cases, the mechanism for sharing the change will be the same. Let’s simulate this situation from the side of the original dataset.
We finished the first module by adding a new image file, which we did not convert to monochrome like the previous ones. Let’s navigate back to the original dataset and do the conversion:
cd ../my_dataset
# if using a virtual environment:
# source ~/.venvs/rdm-workshop/bin/activate
datalad run \
--input inputs/images/king_01.jpg \
--output outputs/images_greyscale/king_01_grey.jpg \
-m "Convert the third image" \
python code/greyscale.py {inputs} {outputs}
[INFO ] Making sure inputs are available (this may take some time)
[INFO ] == Command start (output follows) =====
[INFO ] == Command exit (modification check follows) =====
add(ok): outputs/images_greyscale/king_01_grey.jpg (file)
save(ok): . (dataset)
This created a new file in outputs (always good to check it and see
that the history got updated). To publish the change (update the
external repository) we can use the same command that we used when
publishing the dataset for the first time, i.e. datalad push:
datalad push --to gin
copy(ok): outputs/images_greyscale/king_01_grey.jpg (file) [to gin...]
publish(ok): . (dataset) [refs/heads/git-annex->gin:refs/heads/git-annex 4e1950b..bb7f8dd]
publish(ok): . (dataset) [refs/heads/main->gin:refs/heads/main 6e75962..84f56f9]
action summary:
copy (ok: 1)
publish (ok: 2)
In the output we can see that only the new file was copied - datalad was aware that other files remained unchanged and did not reupload them.
Let’s now switch back to the clone. The command for incorporating
changes from a sibling is datalad update, additionally specifying
the source location via the -s option and the type of update via
the --how option:
cd ../cloned-dataset
datalad update -s origin --how merge
[INFO ] Fetching updates for Dataset(/home/alice/Documents/rdm-workshop/cloned-dataset)
merge(ok): . (dataset) [Merged origin/main]
update.annex_merge(ok): . (dataset) [Merged annex branch]
update(ok): . (dataset)
action summary:
merge (ok: 1)
update (ok: 1)
update.annex_merge (ok: 1)
As with datalad clone, we can:
- see that the history is updated (
tig) - see the file can be listed (
ls outputs/images_greyscale)
We could also get this file like any other. However, let’s try
something else - recomputing the result.
Rerun an operation
In this case, the output image is stored in GIN and we could simply
use datalad get to obtain it. However, imagine that we are
interested in reproducing its generation (maybe we have a newer
version of the image processing software, or maybe we had removed all
copies of the output file to save space). When converting the third
image, we used datalad run. This command preserves inputs, outputs,
and the command being used, paving the way for automatic recomputation.
Use tig to view the last commit message and copy (part of) its
shasum. Then, give it to datalad rerun:
datalad rerun 84f56f
[INFO ] run commit 84f56f9; (Convert the third...)
[INFO ] Making sure inputs are available (this may take some time)
get(ok): inputs/images/king_01.jpg (file) [from origin...]
run.remove(ok): outputs/images_greyscale/king_01_grey.jpg (file) [Removed file]
[INFO ] == Command start (output follows) =====
[INFO ] == Command exit (modification check follows) =====
add(ok): outputs/images_greyscale/king_01_grey.jpg (file)
action summary:
add (ok: 1)
get (ok: 1)
run.remove (ok: 1)
save (notneeded: 1)
Notice that we did not have to get the input file in advance - the
(re)run command did that on its own. The datalad run command, when
given both --input and --output argument does the following:
- gets the inputs
- unlocks the outputs (to make sure that they are writable)
- saves the dataset after completion
Consequently, the same is done by datalad rerun.
Interim summary: interacting with remote datasets

(Image from DataLad Handbook)
In the examples above we went through the basic operations for interaction with remote datasets. A basic workflow involves:
- creating a sibling dataset to publish or update from:
datalad create-sibling - publishing the dataset:
datalad push - consuming an existing dataset:
datalad clone - obtaining annexed file content:
datalad get - keeping siblings in sync:
datalad update
This is a core procedure, and can be flexibly adjusted to many contexts. In the example above, we created a dataset in one folder, published it to GIN, and cloned into another folder, collaborating only with ourselves. By itself, this is not very practical, but all the steps would be identical if the clone was on another computer. For example, we could follow this process to keep our laptop and desktop computer in sync (while also having a backup on GIN). Or we could prototype our analysis on a laptop, run it on a shared server or cluster, and get back the outputs. In this way, the workflow can be very useful even when working alone.
That being said, the real joy of remote dataset storage comes with
collaboration. In this scenario, GIN could function as a central
storage, with which several people could interact, adding and
retrieving content. The push and update operations are the same as
previously, but they can be done by different people. Since the
dataset history (with authorship information and commit messages) is
recorded and can be automatically updated, communicating and sharing
changes is greatly simplified.
In the remainder of this module we will exercise such collaboration.
Exercise: remote collaboration
Preparation
Divide participants in pairs, ask to add each other as contributors and clone each other’s dataset.
Changing a cloned dataset
With a cloned dataset, you can do the following:
- Change a (text) file. For example, in the
inputs/images/chinstrap_02.yamlfile we enteredpenguin_count: 2, but if you look closely at the related photograph, there are actually three penguins (one is partially behind a rock). Edit the file and save the changes with an informative commit message, such as “Include penguins occluded by rocks in the count” or something similar. - Add a file. For example, you can use
datalad download-urlto get one of the following pictures (all by Ian Parker on Unsplash). Don’t forget to add a meaningful message!- Gentoo penguins in a sandstorm, download URL:
https://unsplash.com/photos/ptcOlmmtb8w/download?force=true - King penguin backlit by setting sun, download URL:
https://unsplash.com/photos/TLcLDigmTKE/download?force=true - King penguins diving, download URL:
https://unsplash.com/photos/PzAmR_Nt7KM/download?force=true
- Gentoo penguins in a sandstorm, download URL:
- Use
datalad runto create a new file inoutputs/images_greyscale. Convert the newly added image to greyscale using the same method we used for the previous images. - If you want to practice saving, edit more files. For example you can add a location key-value pair to the yaml files. For files from the original dataset, chinstrap penguins were photographed on Two Hummock Islands, and king penguins (king_01.jpg) on Falkland Islands. For the files listed above, two of them on list the location on the website.
Contributing back
When ready, you can contribute back with datalad push. If the other
person has granted you access to their repository (as should be the
case during the workshop), you can do it right away. Note that in this
case you are pushing to origin - this is a default name given to a
sibling when cloning (you can verify the destination first with
datalad siblings):
datalad push --to origin
If the owner hadn’t granted you write access, you would need to submit a pull request - basically make your own copy of their dataset on GIN, push your changes to your copy, and use an automated process to ask them to incorporate your changes. This is a standard procedure for all collaboration based on git (works similarly on GitHub, GitLab, etc.) and it’s a very satisfying process, but we won’t cover it during this workshop.
Getting the contributions locally
When your remote dataset has been modified, you can update your local
copy with the following (note that we are updating from gin because
that’s how we named the sibling when adding it for first publication):
datalad update -s gin --how merge
Key Points
A dataset can be published with
datalad pushA dataset can be cloned with
datalad cloneThe clone operation does not obtain annexed file content, the contents can be obtained selectively
Annexed file contents can be removed (
drop) and reobtained (get) as long as a copy exists somewhereA dataset can be synchronised with its copy (sibling) with
datalad updateGIN is one of the platforms with which DataLad can interact
GIN can serve as a store for both annexed and non-annexed contents