Content tracking with DataLad
Overview
Teaching: 30 min
Exercises: 60 minQuestions
What does version control mean for datasets?
How to create a DataLad dataset?
Objectives
Learn basics of version control
Work locally to create a dataset
Practice basic DataLad commands
Introduction
Alice is a PhD student. She works on a fairly typical research project, which involves collection and processing of data. The exact kind of data she works with is not relevant for us, what’s relevant is that getting from the first sample to the final result is a cumulative process.
When Alice is working locally, she likes to have an automated record of when a given file was last changed, where it came from, what input files were used to generate a given output, or why some things were done. Even if she won’t be sharing the data with anyone, these records might be essential for her future self, when she needs to return to the project after some time. Moreover, Alice’s project is exploratory, and she often makes large changes to her analysis scripts. She enjoys the comfort of being able to return all files to a previously recorded state if she makes a mistake or figures out a better solution. This is local version control.
Alice’s work is not confined to a single computer. She has a laptop and a desktop, and she uses a remote server to run some time-consuming analysis steps. She likes having an automatic and efficient way to synchronise her project files between these places. Moreover, some of the data within the project is collected or analysed by her colleagues, possibly from another team. She uses the same mechanism to synchronise the data with a centralized storage (e.g. network storage owned by her lab), preserving origin and authorship of files, and combining simultaneous contributions. This is distributed version control.
Finally, Alice wants to have a mechanism to publish, completely or selectively, her raw data, or outputs, or both. Or to work selectively with a large collection of files - keeping all of them on a server, and only fetching some to her laptop.
These are typical data management issues which we will touch upon during this workshop. From the technical point of view we will be using DataLad, a data management multi-tool that can assist you in handling the entire life cycle of digital objects. It is a command-line tool, free and open source, and available for all major operating systems. The first module will deal only with local version control. In the next one, we will set the technical details aside and talk about good practices in file management. Later during the workshop we will discuss distributed version control, publish a dataset, and see what it looks like from the perspective of data consumers. In the last module we will talk about more complex scenarios with linked datasets.
In this lesson we will gradually build up an example dataset, discovering version control and basic DataLad concepts in the process. Along the way, we will introduce basic DataLad commands - a technical foundation for all the operations outlined above. Since DataLad is agnostic about the kind of data it manages, we will use photographs and text files to represent our dataset content. We will add these files, record their origin, make changes, track these changes, and undo things we don’t want to keep.
Setting up
In order to code along, you should have a recent DataLad version. The
workshop was developed based on DataLad version 0.16. Installation
instructions are included in the Setup page. If you are unsure about your version of DataLad,
you can check it using the following command:
datalad --version
You should should have a configured Git identity, consisting of your name and email (and the command above will display a complaint if you don’t). That identity will be used to identify you as the author of all dataset operations. If you are unsure if you have configured your Git identity already, you can check if your name and email are printed to the terminal when you run:
git config --get user.name
git config --get user.email
If nothing is returned (or the values are incorrect), you can set them with:
git config --global user.name "John Doe"
git config --global user.email johndoe@example.com
With the --global option, you need to do this once on a given
system, as the values will be stored for your user account. Of course
you can change or override them later.
Note for participants using their own computers. Some examples used to
illustrate data processing require python with pillow library. If you
are using a virtual environment, now is a good time to activate it
(e.g. source ~/.venvs/rdm-workshop/bin/activate). You’ll find more
details in the Setup page.
How to use DataLad
DataLad is a command line tool and it has a Python API. It is operated in your terminal using the command line (as done above), or used in scripts such as shell scripts, Python scripts, Jupyter Notebooks, and so forth. We will only use the command line interface during the workshop.
The first important skill in using a program is asking for help. To do so, you can type:
datalad --help
This will display a help message, which you can scroll up and down
using arrows and exit with q. The first line is a usage note:
Usage: datalad [global-opts] command [command-opts]
This means that to use DataLad you will need to type in the main
command (datalad) followed by a sub-command. The (sub-)commands are
listed in the help message. The most important for now are datalad
create and datalad save, and we will explain them in detail during
this lesson.
Both the main command and the sub-command can accept options. Options
usually start with a dash (single letter, e.g. -m) or two dashes
(longer names, e.g. --help which we have just used). Some commands
will have both the long form and the short form.
You can also request help for a specific command, for example:
datalad create --help
Using the shorter -h flag instead of --help will return a concise
overview of all subcommands or command options.
datalad create -h
Usage: datalad create [-h] [-f] [-D DESCRIPTION] [-d DATASET] [--no-annex]
                      [--fake-dates] [-c PROC] [--version]
                      [PATH] ...

Use '--help' to get more comprehensive information.
Getting started: create an empty dataset
All actions we do happen in or involve DataLad datasets. Creating a
dataset from scratch is done with the datalad create command.
datalad create only needs a name, and it will subsequently create a
new directory under this name and instruct DataLad to manage it. Here,
the command also has an additional option, the -c text2git
option. With the -c option, datasets can be pre-configured in a
certain way at the time of creation, and text2git is one of the
available run procedures (later we’ll explain why we chose to use it
in this example):
datalad create -c text2git my-dataset
[INFO   ] Creating a new annex repo at /home/bob/Documents/rdm-workshop/my-dataset
[INFO   ] Running procedure cfg_text2git
[INFO   ] == Command start (output follows) =====
[INFO   ] == Command exit (modification check follows) =====
create(ok): /home/bob/Documents/rdm-workshop/my-dataset (dataset)
The last output line confirms that the create operation was
successful. Now, my-dataset is a new directory, and you can change
directories (cd) inside it:
cd my-dataset
Let’s inspect what happened. Let’s start by listing all contents, including hidden ones (on UNIX-like system, files or folders starting with a dot are treated as hidden):
ls -a
. .. .datalad .git .gitattributes
The . and .. represent current and parent directory,
respectively. More interestingly, there are two hidden folders,
.datalad and .git as well as a hidden .gitattributes file. They
are essential for dataset functioning, but typically we have no need
to touch them.
Next, we can invoke tig, a tool which we will use to view the
dataset history. Tig displays a list of commits - a record of
changes made to the document. Each commit has a date, author, and
description, and is identified by a unique 40-character sequence
(displayed at the bottom) called shasum or hash. You can move up
and down the commit list using up and down arrows on your keyboard,
use enter to display commit details, and q to close detail view or
Tig itself.
We can see that DataLad has already created two commits on our behalf. They are shown with the most recent on top:
tig
2021-10-18 16:58 +0200 John Doe o [main] Instruct annex to add text files to Git
2021-10-18 16:58 +0200 John Doe I [DATALAD] new dataset
Version control
Version controlling a file means to record its changes over time,
associate those changes with an author, date, and identifier, creating
a lineage of file content, and being able to revert changes or restore
previous file versions. DataLad datasets can version control their
contents, regardless of size. Let’s start small, and just create a
README.md.
We will use a text editor called nano to work without leaving the
command line. You can, of course, use an editor of your
preference. Open the editor by typing nano and write the file
content:
# Example dataset

This is an example datalad dataset.
Nano displays the available commands on the bottom. To save (Write
Out) the file, hit Ctrl-O, type the file name (README.md), and hit
enter. Then, use Ctrl-X to exit.
datalad status can report on the state of a dataset, and we will use
it a lot. As we added a new file, README.md will show up as being
untracked if you run datalad status:
datalad status
untracked: README.md (file)
In order to save a modification in a dataset use the datalad save
command. datalad save will save the current state of your dataset:
It will save both, modifications to known files and yet untracked
files. The -m/--message option lets you attach a concise summary of
your changes. Such a commit message makes it easier for others and
your later self to understand a dataset’s history:
datalad save -m "Add a short README"
Let’s verify that it got recorded in history:
tig
2021-10-18 17:20 +0200 John Doe o [main] Add a short README
2021-10-18 16:58 +0200 John Doe o Instruct annex to add text files to Git
2021-10-18 16:58 +0200 John Doe I [DATALAD] new dataset
Let’s add some “image data”, represented here by jpeg images. For demonstration purposes, we will use photos available with a permissive license from Unsplash. Start by creating a directory for your data. Let’s call it inputs/images, to make it clear what it represents.
mkdir -p inputs/images
Then, let’s put a file in it. To avoid leaving terminal, we will use the Linux
wget command. This is just for convenience - the effect would be the same if
we opened the link in the browser and saved the file from there.
The -O option specifies the output file - since this is a photo of chinstrap
penguins, and we may expect multiple of those, let’s name the file chinstrap_01.jpg.
We are specyfying the URL as a string (i.e. in quotation marks), to avoid
confusing our computer with the ? character, which can be interpreted as a
placeholder for any character.
wget -O inputs/images/chinstrap_01.jpg "https://unsplash.com/photos/3Xd5j9-drDA/download?force=true"
We can view the current file / folder structure by using the Linux
tree command:
tree
.
├── inputs
│   └── images
│       └── chinstrap_01.jpg
└── README.md
While we’re at it, lets open the readme file (nano README.md) and
make a note on how we organize the data. Note the unobtrusive markdown
syntax for headers, monospace, and list items, which may be used for
rendering by software or websites. With nano, save and exit with:
Ctrl-O, enter, Ctrl-X:
# Example dataset

This is an example DataLad dataset.

Raw data is kept in `inputs` folder:
- penguin photos are in `inputs/images`
Okay, time to check the datalad status:
untracked: inputs (directory)
 modified: README.md (file)
The inputs directory has some new contents, and it is shown as
untracked. The README file now differs from its last known state,
and it shows up as modified. This is a good moment to record these
changes. Note that datalad save would save all modifications in
the dataset at once! If you have several modified files, you can
supply a path to the file or files you want to save. We will do it this
way, and record two separate changes:
datalad save -m "Add first penguin image" inputs/images/chinstrap_01.jpg
datalad save -m "Update readme" README.md
We can see that these changes got recorded with tig.
For now, we have manually downloaded the file and saved it to the
dataset. However, saving a file from an URL is a common scenario,
whether we are using a public repository or a local network
storage. For that, DataLad has a datalad download-url method. Let’s
use it to download another file (this command also provides the -O
option to specify an output path, similar to wget):
datalad download-url -O inputs/images/chinstrap_02.jpg "https://unsplash.com/photos/8PxCm4HsPX8/download?force=true"
Afterwards, datalad status shows us that there is nothing to
save. The download-url command not only downloaded the file, but
also performed a datalad save on our behalf. We can use tig to
inspect the commit message:
[DATALAD] Download URLs

URLs:
  https://unsplash.com/photos/8PxCm4HsPX8/download?force=true
This is a notable improvement compared to the previous image, because in addition to recording the addition of the picture we also stored its source. What’s more, DataLad is aware of that source, and has all the information needed to remove and reobtain the file on demand… but that’s another topic altogether.
To practice saving changes and to make our example dataset more similar to the real-life datasets, let’s add some more files, this time in the form of sidecar metadata. Let’s suppose we want to store the picture author, license under which the file is available, and, let’s say, the number of penguins visible in the photo. For each image, we will create a yaml file (a simple text file following a set of rules to store variables) with the same name but different extension:
nano inputs/images/chinstrap_01.yaml
photographer: Derek Oyen
license: Unsplash License
penguin_count: 3
nano inputs/images/chinstrap_02.yaml
photographer: Derek Oyen
license: Unsplash License
penguin_count: 2
We can use the already familiar datalad save command to record
these changes (addition of two files):
datalad save -m "Add sidecar metadata to photos"
Breaking things (and repairing them)
A huge appeal of version control lies in the ability to return to a
previously recorded state, which enables experimentation without
having to worry about breaking things. Let’s demonstrate by breaking
things on purpose. Open the README.md file, remove most of its
contents and save. You can use cat README.md to display the file
contents and make sure that they are, indeed, gone. The datalad
status reports that the file changed, but the change has not been
saved in the dataset history:
datalad
status
modified: README.md (file)
In this situation, you can restore the file to its previously recorded state by running:
git restore README.md
Note that git is the program used by DataLad under the
hood for version control. While most dataset operations can be
performed using datalad commands, some will require calling git
directly. After running git restore, you can use datalad status to
see that the dataset is now clean, and cat README.md to see that the original
file contents are back as if nothing happened - disaster
averted. Finally, check tig to see that the dataset history remained
unaffected.
Now, let’s take things one step further and actually datalad save
some undesired changes. Open the README.md, wreak havoc, and save
it:
nano README.md
# Example dataset

HAHA all description is gone
This time we are committing these changes to the dataset history:
datalad save -m "Break things"
The file was changed, and the changes have been committed. Luckily, git
has a method for undoing such changes, git revert, which can work
even if subsequent save operations have been performed on the
dataset. To call it, we need to know the commit hash (unique
identifier) of the change which we want to revert. It is displayed by
tig at the bottom of the window and looks like this:
8ddaaad243344f38cd778b013e7e088a5b2aa11b (note: because of the
algorithm used by git, yours will be different). Don’t worry, we only
need the first couple characters. Find your commit hash and call git
revert taking the first few characters (seven should be plenty):
git revert --no-edit 8ddaaad
With the --no-edit option, git revert will create a default commit
message; without it it would open your default editor and let you
edit the commit message. Like previously, after reverting the changes, datalad
status shows that there is nothing to save and cat README.md proves
that the removed file contents are back. This time, tig shows that
git revert created a new commit that
reverted the changes (note that recent commits can also be completely removed
from history with git reset but this is beyond the scope of this
lesson).
Data processing
We have demonstrated building a dataset history by collecting data and changing it manually. Now it is time to demonstrate some script-based data processing. Let’s assume that our project requires us to convert the original files to greyscale. We can do this with a simple Python script. First, let’s create two new directories to keep code and outputs, i.e. processing results, in designated places:
mkdir code
mkdir -p outputs/images_greyscale
Now, let’s “write” our custom script. You can download it using wget (below), or copy its content from here and then save it as part of the dataset:
wget -O code/greyscale.py https://github.com/psychoinformatics-de/rdm-course/raw/gh-pages/data/greyscale.py
datalad save -m "Add an image processing script"
This script for greyscale conversion takes two arguments, input_file
and output file. You can check this with python code/greyscale.py
--help. Let’s apply it for the first image, and place the output in the
outputs/images_greyscale directory, slightly changing the name:
python code/greyscale.py inputs/images/chinstrap_01.jpg outputs/images_greyscale/chinstrap_01_grey.jpg
Note that our working directory is in the root of the dataset, and we are calling the script using relative paths (meaning that they are relative to the working directory, and do not contain the full path to any of the files). This is a good practice: the call looks the same regardless of where the dataset is on our drive.
You should be able to verify that the output file has been created and that the image is, indeed, converted to greyscale. Now all that remains is to save the change in the dataset:
datalad save -m "Convert the first image to greyscale"
Let’s take a look at our history with tig. It already looks pretty
good: we have recorded all our operations. However, this record is
only as good as our descriptions. We can take it one step further.
Datalad has the ability to record the exact command which was used,
and all we have to do for this is to prepend datalad run to our command. We can
also provide the commit message to datalad run, just as we could with
datalad save. Let’s try this on the other image:
datalad run -m "Convert the second image to greyscale" python code/greyscale.py inputs/images/chinstrap_02.jpg outputs/images_greyscale/chinstrap_02_grey.jpg
As we can see, datalad run executes the given command and follows
that by automatically calling datalad save to store all changes
resulting from this command in the dataset. Let’s take a look at the
full commit message with tig (highlight the commit you want to see
and press enter):
[DATALAD RUNCMD] Convert second image to grayscale
=== Do not change lines below ===
{
"chain": [],
"cmd": "python code/greyscale.py inputs/images/chinstrap_02.jpg outputs/images_greyscale/chinstrap_02_grey.jpg",
"dsid": "b4ee3e2b-e132-4957-9987-ca8aad2d8dfc",
"exit": 0,
"extra_inputs": [],
"inputs": [],
"outputs": [],
"pwd": "."
}
^^^ Do not change lines above ^^^
There is some automatically generated text, and inside we can easily
find the command that was executed (under "cmd" keyword). The record
is stored using json formatting, and as such can be read not just by
us, but also by DataLad. This is very useful: now we will be able to
rerun the exact command if, for example, input data gets changed, the
script gets changed, or we decide to remove the outputs. We won’t try
that now, but the command to do so is datalad rerun.
Locking and unlocking
Let’s try something else: editing an image which already exists. We have done so with text files, so why should it be different?
Let’s try doing something nonsensical: using the first input image
(chinstrap_01.jpg) and writing its greyscale version
onto the second output image (chinstrap_02_grey.jpg). Of
course the computer doesn’t know what makes sense - the only thing
which might stop us is that we will be writing to a file which already
exists. This time we will skip datalad run to avoid creating a record
of our little mischief:
python code/greyscale.py inputs/images/chinstrap_01.jpg outputs/images_greyscale/chinstrap_02_grey.jpg
Traceback (most recent call last):
File "/home/bob/Documents/rdm-warmup/example-dataset/code/greyscale.py", line 20, in <module>
grey.save(args.output_file)
File "/home/bob/Documents/rdm-temporary/venv/lib/python3.9/site-packages/PIL/Image.py", line 2232, in save
fp = builtins.open(filename, "w+b")
PermissionError: [Errno 13] Permission denied: 'outputs/images_greyscale/chinstrap_02_grey.jpg'
Something went wrong: PermissionError: [Errno 13] Permission denied says the
message. What happened? Why don’t we have the permission to change the
existing output file? Why didn’t we run into the same problems when
editing text files? To answer that question we have to introduce the
concept of annexed files and go back to the moment when we created
our dataset.
DataLad uses two mechanisms to control files: git and
git-annex. This duality exists because it is not possible to store
large files in git. While git is especially good at tracking text
files (and can also handle files other than text) it would quickly run
into performance issues. We will refer to the files controlled by
git-annex as annexed files. There are no exact rules for what is a
large file, but a boundary between “regular” and annexed files has
to be drawn somewhere.
Let’s look at the first two commit messages in tig. The second says:
o Instruct annex to add text files to Git
Remember how we created the dataset with datalad create -c text2git
my-dataset? The -c text2git option defined the distinction in a
particular way: text files are controlled with git, other (binary)
files are annexed. By default (without text2git) all files would be
annexed. There are also other predefined configuration options, and it’s
easy to tweak the setting manually (however, we won’t do this in this
tutorial). As a general rule you will probably want to hand some text
files to git (code, descriptions), and annex others (especially those
huge in size or number). In other words, while text2git works well
for our example, you should not treat it as the default approach.
One essential by-product of the above distinction is that annexed files are write-protected to prevent accidental modifications:

If we do want to edit the annexed file, we have to unlock it:
datalad unlock outputs/images_greyscale/chinstrap_02_grey.jpg
Now, the operation should succeed:
python code/greyscale.py inputs/images/chinstrap_01.jpg outputs/images_greyscale/chinstrap_02_grey.jpg
We can open the image to see that it changed, and check:
datalad
status
modified: outputs/images_greyscale/chinstrap_02-grey.jpg (file)
The file will be locked again after running datalad save:
datalad save -m "Make a mess by overwriting"
We could revert the changes we just saved, but let’s overwrite the file
using correct inputs instead, to demonstrate another feature of
datalad run. The sequence of actions we just did (unlock - change -
save) is not uncommon, and datalad run has provisions to make all
three things happen at once, without the explicit unlock call. What
we need is the --output argument to tell datalad to prepare the
given file for writing (unlock it). Additionally, we will also use the
--input option (which tells datalad that this file is needed to run
the command). Although --input is not necessary in the current
example, we will introduce it for the future. Finally, to avoid
repetition, we will use {inputs} and {outputs} placeholder in the
run call.
datalad run \
    --input inputs/images/chinstrap_02.jpg \
    --output outputs/images_greyscale/chinstrap_02_grey.jpg \
    -m "Convert the second image again" \
    python code/greyscale.py {inputs} {outputs}
[INFO   ] Making sure inputs are available (this may take some time)
unlock(ok): outputs/images_greyscale/chinstrap_02_grey.jpg (file)
[INFO   ] == Command start (output follows) =====
[INFO   ] == Command exit (modification check follows) =====
add(ok): outputs/images_greyscale/chinstrap_02_grey.jpg (file)
Success! Time to look at the images, and then check the dataset
history with tig. The commit message contains the following:
[DATALAD RUNCMD] Convert the second image again

=== Do not change lines below ===
{
 "chain": [],
 "cmd": "python code/greyscale.py '{inputs}' '{outputs}'",
 "dsid": "b4ee3e2b-e132-4957-9987-ca8aad2d8dfc",
 "exit": 0,
 "extra_inputs": [],
 "inputs": [
  "inputs/images/chinstrap_02.jpg"
 ],
 "outputs": [
  "outputs/images_greyscale/chinstrap_02_grey.jpg"
 ],
 "pwd": "."
}
^^^ Do not change lines above ^^^
Making some more additions
Let’s make a few more changes to the dataset. We will return to it in the workshop module on remote collaboration. As an exercise, do the following steps using DataLad commands:
- Download the king penguin image from this url:
https://unsplash.com/photos/8fmTByMm8wE/download?force=trueand save it asinputs/images/king_01.jpg - Create a yaml file with the following content and save changes in the
dataset:
photographer: Ian Parker license: Unsplash License penguin_count: 5 - Add the following acknowledgments at the end of the README:
## Credit

Photos by [Derek Oyen](https://unsplash.com/@goosegrease)
and [Ian Parker](https://unsplash.com/@evanescentlight)
on [Unsplash](https://unsplash.com)
Solution
Download file using
download-url:datalad download-url \ -m "Add third image" \ -O inputs/images/king01.jpg \ "https://unsplash.com/photos/8fmTByMm8wE/download?force=true"Create the yaml file, e.g. using nano, and update the dataset:
nano inputs/images/king_01.yaml
# paste the contents and save
datalad save -m "Add a description to the third picture"
Edit the readme file, e.g. using nano, and update the dataset:
nano README.md
# paste the contents and save
datalad save -m "Add credit to README"
Key Points
With version control, lineage of all files is preserved
You can record and revert changes made to the dataset
DataLad can be used to version control a dataset and all its files
You can manually save changes with
datalad saveYou can use
datalad download-urlto preserve file originYou can use
datalad runto capture outputs of a command“Large” files are annexed, and protected from accidental modifications
Structuring data
Overview
Teaching: 90 min
Exercises: 0 minQuestions
What is a good filename?
How to keep data neatly structured?
Objectives
List good practices in organizing data
Distinguish between text vs binary data
Explore lightweight text files and how they can be useful
Introduction
This module is dedicated to good practices in data organization. We will discuss little things which may seem prosaic but can go a long way in making your life easier: file names, text files, project structure.
How to name a file?
This section is based on the presentations “Naming Things” (CC0) by Jenny Bryan and “Project structure” by Danielle Navarro.
A file name exists to identify its content. There are different opinions as to what exactly is a good file name, but they usually revolve around the three main principles:
- be machine readable
- be human readable
- make sorting and searching easy
A universal gold standard probably does not exist and we do not claim to possess one. What we can do, however, is to focus on identifying patterns in file naming which can make working with data easier.
Let’s start with a good example for naming what appears to be a collection of materials for an English literature class:
✅ reading01_shakespeare_romeo-and-juliet_act01.docx
✅ reading01_shakespeare_romeo-and-juliet_act02.docx
✅ reading01_shakespeare_romeo-and-juliet_act03.docx
✅ reading02_shakespeare_othello.docx
✅ reading19_plath_the-bell-jar.docx
A “bad” (meaning harder to work with) way of naming the same files could look like this:
❌ Romeo and Juliet Act 1.docx
❌ Romeo and juliet act 2.docx
❌ Shakespeare RJ act3.docx
❌ shakespeare othello I think?.docx
❌ belljar plath (1).docx
Not only does the first example look much more orderly, it is also better at accomplishing the three goals above. Let’s take a closer look.
Machine readable
Avoid white spaces
A lot of trouble with white spaces comes from using file names in
command line or in code. In a command line syntax spaces are used to
separate arguments. A file name with spaces needs to be enclosed in
quotes, or the spaces need to be escaped with a \ symbol.
edit my file.txt    # won't be understood
edit "my file.txt"  # names can be quoted
edit my\ file.txt   # spaces can be escaped
It can be annoying and adds complexity, but it also causes additional trouble when names are passed from one script to another (requiring escaping the escape character or mixing quote symbols).
With that in mind:
✅ romeo-and-juliet_act01.docx
✅ midsummer-nights-dream.docx

❌ romeo and juliet act 1.docx
❌ midsummer nights dream.docx
Use only letters, numbers, hyphens, and underscores
- Sometimes there are character encoding issues (less common now)
- Some characters (such as
'^.*?$+|) have special meaning for command line tools, e.g.?may mean “match any character” - Some characters are harder to enter:
ü,ł, … - Some are outright forbidden by some operating systems,
eg.
<>:"/\|?*on Windows
✅ what-the-cat.docx
✅ essay_romeo-and-juliet_draft01.docx

❌ what-the-cat?.docx
❌ essay "romeo and juliet" draft01.docx
❌ essay "romeo and juliet" draft01(1).docx
Don’t rely on letter case
- Some operating systems (or file systems) treat upper and lower case
differently (
appleandAppleare two files) and some don’t (appleandAppleare the same file) - Do not use letter case to distinguish two files
- Be consistent
✅ othello.docx
✅ romeo-and-juliet.docx

❌ othello.docx
❌ Othello.docx
❌ Romeo-and-juliet.docx
Use separators in a meaningful way:
- Use
-to join words into one entity. - Use
_to separate entities.
So if a pattern is [identifier] [author] [title] [section(optional)]:
✅ reading01_shakespeare_romeo-and-juliet_act01.docx
✅ reading01_shakespeare_romeo-and-juliet_act02.docx
✅ reading02_shakespeare_othello.docx
✅ reading19_plath_the-bell-jar.docx
Alternatively, if you need to combine flexibility and unambiguity (meaning that for a given file you need to include a subset of many possible entities, and don’t want to consult the documentation for what each filename part represents) you may decide to:
- use
-for key-value encoding, - use
_to separate entities.
For a hypothetical experiment:
✅ sub-12_sess-pre_task-fingertapping_run-1.dat
✅ sub-12_sess-post_task-fingertapping_run-1.dat
Most programming languages will have easy ways to split the filenames by a given character, and you can work from there.
Human readable
Especially in a free-form content it’s nice to use a slug (term borrowed by clean website URLs from newspaper publishing, meaning a short name):
✅ "analysis01_descriptive-statistics.R"
✅ "analysis02_preregistered-analysis.R"
✅ "notes01_realising-the-problem.txt"
✅ "analysis03_departing-from-the-plan.R"
✅ "notes02_tentative-write-up.docx"
Easy to sort and search
Follow ISO 8601 when using dates
Including a date in a file name is rarely needed. For example, if you
want to keep track of changes it is better to use version control
tools. However, sometimes the date can be a crucial piece of
information (e.g. weather data collected daily) or you may wish to
keep things in chronological order when sorting by file names
(e.g. meeting notes). If including dates, follow the ISO 8601 standard
(YYYY-MM-DD), which is widely recognized and maintains chronology in
alphabetical ordering:
2021-09-14_preliminary-meeting.org
2021-09-27_rdm-workshop-planning.org
2021-10-10_progress-report.org
There’s a relevant xkcd.
Zero pad numbers
- You can use numbers as a prefix to order files
- However, it’s a double-edged sword: if the order changes, you’ll need to rename everything
- Usually,
10_abcwill come before2_abc, so zero-pad as necessary
01_preface.docx
02_introduction.docx
03_method.docx
etc...

19_appendix-tables.docx
20_appendix-glossary.docx
Include keywords
Consistent keywords make searching (globbing) easier (be it graphical interface, terminal, or code):
reading01_shakespeare_romeo-and-juliet_act01.docx
reading01_shakespeare_romeo-and-juliet_act02.docx
reading01_shakespeare_romeo-and-juliet_act03.docx
reading02_shakespeare_othello.docx
reading19_plath_the-bell-jar.docx
notes02_shakespeare_othello.docx
notes19_plath_the-bell-jar.docx
Most tools and programming languages will provide a way to filter file names. For example, to find materials from unit 19 in bash terminal:
ls *19_*
reading19_plath_the-bell-jar.docx
notes19_plath_the-bell-jar.docx
Or to find notes in Python:
import glob
glob.glob(notes*)
notes02_shakespeare_othello.docx
notes19_plath_the-bell-jar.docx
Summary
In practice
You need to know what a file contains, and you need to find the file you need.
Machine readable means that it’s easy to operate on file names and extract information from them:
- Avoid white spaces
- Use only letters, numbers, hyphens, and underscores
- Don’t rely on letter case
- Use separators in a meaningful way
Human readable means that it’s easy to figure out what something is by looking at its name.
- Include a slug
To make things easy to sort and search
- Follow ISO 8601 when using dates
- Zero pad numbers
- Include keywords
Avoid leaking undesired information
When dealing with personal data, pseudonymisation is a common practice. While, for example, a name composed of birth date and initials may be sufficient to distinguish subjects within a study, a file with such a name can hardly be considered deidentified.
If a dataset is being version controlled (which means that its history of changes is being recorded), this poses an additional challenge: file name changes are also tracked, and the record of the change is preserved.
This is what it may look like in the case of DataLad:
touch name-with-identifying-information.dat
datalad save
A few moments later - oops…!
git mv name-with-identifying-information.dat a-new-name.dat
datalad save
However, the rename operation is recorded in dataset history. Comparing previous state to the current state:
git diff HEAD~1 HEAD
diff --git a/name-with-identifying-information.dat b/a-new-name.dat
similarity index 100%
rename from name-with-identifying-information.dat
rename to a-new-name.dat
There are ways to “rewrite history”, but doing so can be difficult and potentially destructive.
File types (text vs binary)
Any dataset will likely store different kinds of data, and use different file formats to do so. There is a myriad of formats; sometimes, the format choice for a given type of data will be obvious (dictated by universally accepted or field-specific standards), sometimes there will be several possibilities. Leaving the formats aside, one broad distinction can be made: text vs binary.
- Text file is a file structured as a sequence of lines containing text, composed of characters.
- Binary file is anything other than a text file.
A text file can be viewed and edited using a text editor . The lines are delimited by a newline character, typically written as \n. Note that although some editors will wrap lines for display purposes, this is purely visual, as the line endings are stored in the file.
Here’s a quick overview of commonly found text and binary files. Note that although we are identifying them by extension, on UNIX-like systems the extensions are just part of a file name and are customary rather than essential.
| Text | Binary |
|---|---|
| .txt | images: .jpg, .png, .tiff |
| markup: .md, .rst, .html | documents: docx, .xlsx, .pdf |
| source code: .py, .R, .m | compiled files: .pyc, .o, .exe |
| text-serialised formats: .toml, yaml, json, xml | binary-serialised formats: .pickle, .feather, .hdf |
| delimited files: .tsv, .csv | domain-specific: .nii, .edf |
| vector graphics: .svg | compressed: .zip .gz, .7z |
| … | … |
We’ll take a closer look at “markup”, “serialised” and “delimited” files a bit later. Now, note some potentially surprising facts:
- Scalable Vector Graphics (SVG) is actually a text file, where all objects are described with XML notation.
For example, this is a blue rectangle with a black border:
<rect width="300" height="100" style="fill:rgb(0,0,255);stroke-width:3;stroke:rgb(0,0,0)" />. - A Word document (.docx) is not a text file, but actually a zipped XML, and therefore binary. It follows the Office Open XML specification. Although what you see is mostly text, the file can pack different contents. The same goes, for example, for .xlsx.
Implications of file types for version control
One important feature of text files is that they can be version controlled on a line by line basis. So if you have a long file, but only change it in a few places, changes will be recorded for the specific lines. Moreover, it will be easy to display what the modification involved, by portraying it as lines being taken out and added (in programming slang, this is called a file diff).
Compare this to a binary file, which does not have a line structure. It’s easy to notice that a file changed, but it’s not easy to show what changed inside. Version control systems, including DataLad, will also track binary files, but the (in)ability to distinguish or display lines will make it more similar to a per-file basis.
The distinction is relevant for many DataLad datasets. While DataLad provides a single interface for all files, it may treat them differently according to certain rules. By the default rule, all files are annexed (information about the file presence and its content are somewhat separated, and git-annex is the program used under the hood for file tracking). This is good for large files, but less so for smaller text files when we care about single-line changes (eg. source code). For this reason, in the previous module we used the text2git configuration, dividing the files into text (not annexed, controlled by git) and binary (annexed, controlled by git-annex). However, in real-life this might not be a good solution either, as it can unnecessarily burden the non-annexed part of the dataset (imagine having tons of svg files, or html reports with embedded graphics). For this reason you may wish to set the rules by specific folders, filename patterns, or file sizes instead (we won’t do it now, but an explanation can be found in the DataLad handbook).
In addition to performance, there are other visible consequences of annexing. We have already observed one: to protect the data from accidental modifications, DataLad will content-lock the annexed files, disabling your permission to edit them (the files can be unlocked manually with datalad unlock or automatically when using datalad run). Two more consequences will become apparent in the subsequent module dedicated to data publishing and consumption. First, not all data hosting services accept annexed content, and you may need to publish it separately. Second, when you retrieve a copy of dataset from elsewhere, the annexed content is obtained on demand, rather than immediately.
Different flavors of text files
Text files may be simple in their structure, but they can be very powerful in their ability to store content. Tabular data, sets of parameters, key-value metadata, configuration options, free-form descriptions… there’s a good chance that you’ll find a text-based representation that will be easy to create and easy to work with. With that in mind, let’s look at different flavors of text files. All the example formats below are human- and machine-readable. They have all become widely accepted standards and you will likely find a library for reading these files in your favorite programming language.
Plain text
A plain text file is just that, plain text.
Here is plain text.
A very simple file, this
can be read by all.
Markdown
A very common format for representing free-form text is Markdown. Markdown a lightweight markup language, meaning that it introduces some unobtrusive syntax for marking headers, emphasis, links, blocks of code, etc:
# Markdown example

## Some things for which markdown has rules

- Lists
- Marking emphasis with *italics* or **bold**
- Links, such as [example](https://example.com)
- Some `inline code` (and code blocks, not shown)
Fairly standardized and very popular, Markdown is recognized by many programs and platforms. While it is readable as-is, many code-hosting websites, such as GitHub, will recognize markdown files (giving special attention to those named README) and render them as html in the web interface. Markdown files are a good choice for describing things in a free narrative - your project, dataset, or analysis. This course’s materials have also been written in Markdown!
There are other markup languages for similar purposes, such as reStructuredText (popular choice in the world of Python documentation), AsciiDoc, or Org Mode (popular among the users of Emacs text editor). Html is also a markup language, but in most cases it is easier to write in one of the lightweight languages and then convert the documents to html.
Delimited files: csv, tsv
Moving on from narrative to data, comma-separated files (.csv) and tab-separated files (.tsv) are simple and common ways to represent tabular data. The example below comes from the Palmer Penguins dataset:
species,island,bill_length_mm,bill_depth_mm,flipper_length_mm,body_mass_g,sex,year
Adelie,Torgersen,39.1,18.7,181,3750,male,2007
Adelie,Torgersen,39.5,17.4,186,3800,female,2007
Adelie,Torgersen,40.3,18,195,3250,female,2007
Adelie,Torgersen,NA,NA,NA,NA,NA,2007
Adelie,Torgersen,36.7,19.3,193,3450,female,2007
Configuration and data serialization: toml, yaml & json
Some formats were made for serialization (or interchange) – converting data objects into an easily transmittable form. They can be useful for storing configurations, or keeping (meta-)data which is best represented as key-value pairs. Most programming languages will have tools for reading and writing these files.
Here are examples of YAML (YAML Ain’t Markup Language), TOML (Tom’s Obvious Minimal Language), and JSON (JavaScript Object Notation). The example data were taken from TOML’s website:
title: Example
owner:
  dob: 1979-05-27 07:32:00-08:00
  name: Tom Preston-Werner
database:
  data:
  - - delta
    - phi
  - - 3.14
  enabled: true
  ports:
  - 8000
  - 8001
  - 8002
  temp_targets:
    case: 72.0
    cpu: 79.5
# This is a TOML document

title = "Example"

[owner]
name = "Tom Preston-Werner"
dob = 1979-05-27T07:32:00-08:00

[database]
enabled = true
ports = [ 8000, 8001, 8002 ]
data = [ ["delta", "phi"], [3.14] ]
temp_targets = { cpu = 79.5, case = 72.0 }
{
    "title": "Example",
    "owner": {
        "dob": "1979-05-27 07:32:00-08:00",
        "name": "Tom Preston-Werner"
    },
    "database": {
	"enabled": true,
	"ports": [
            8000,
            8001,
            8002
        ],
        "data": [
            [
                "delta",
                "phi"
            ],
            [
                3.14
            ]
        ],
        "temp_targets": {
            "case": 72.0,
            "cpu": 79.5
        }
    }
}
Sidecar metadata strategy
Sometimes, it is desirable to combine binary and text files to represent the same data object. This could be useful if the binary format does not have the possibility to store some metadata, or simply because we want to make the metadata easily readable to anybody (i.e. without requiring potentially uncommon software which can open our binary format).
Let’s assume our dataset contains photographs of penguins, collected for research purposes. Suppose that we want to keep the penguin species, picture identifier, and image type in the file name (to make this information easily searchable), but there is additional metadata that may be needed for analysis. We can decide to store the image data in a jpeg file (binary) and the metadata in a yaml file (text). Thus, we will use two files with the same base name and different extensions:
adelie_087_color.jpeg
adelie_087_color.yaml
Content of the yaml file:
species: Adelie
island: Torgersen
penguin_count: 1
sex: MALE
photographer: John
As a side note, jpeg files do support quite a lot of metadata (Exif) but most likely they are neither sufficient nor convenient for our research.
Describing columns in tabular files
Another place where the sidecar files could come useful is alongside the tabular files (csv/tsv). Remember the penguin csv table above? The column names were pretty self-explanatory, but a description could make things even clearer. Other datasets could probably benefit even more from a description like this (also from the Palmer Penguins dataset):
species: a factor denoting penguin species (Adélie, Chinstrap and Gentoo)}
island: a factor denoting island in Palmer Archipelago, Antarctica (Biscoe, Dream or Torgersen)}
bill_length_mm: a number denoting bill length (millimeters)}
...
You could even go a step further, and for each label provide several pieces of information. These could include: long name, free-form description, definitions of factor levels (especially useful if they are numeric), links to ontologies. Using yaml syntax, we could rewrite the above description in the following way:
species:
  description: a factor denoting penguin species
  levels:
    Adélie: P. adeliae
    Chinstrap: P. antarctica
    Gentoo: P. papua
  termURL: https://www.wikidata.org/wiki/Q9147
bill_length_mm:
  description: a number denoting bill length
  units: mm
File / directory structure
Above, we have been dealing mostly with file naming and file types. What remains is a way these files are organised into directories. This might seem like a trivial issue, but the way files are organised affects:
- the ease of manual browsing
- the ease of creating script-based analysis
- the ability to use automated tools which rely on a predefined structure
- the ability of others to understand your project
In fact, all of us are probably using some sort of rules to organise our data. These rules may come from a field-specific or lab-specific standard, or simply follow common sense. In either case, the overall logic will probably be similar and try to incorporate (in various orders) levels such as:
- experiment
- subject or specimen
- data acquisition instance (session, repetition)
- data type or measurement method.
Using a consistent pattern within an experiment makes scripting easier. Using a consistent pattern across experiment, or across labs, saves time on repetitive processing steps and simplifies collaboration, as it is much easier to figure out what goes where.
Keeping inputs and outputs separately
Consider the following:
/dataset
├── sample1
│   └── a001.dat
├── sample2
│   └── a001.dat
...
which after applying a transform (preprocessing, analysis, …) becomes:
/dataset
├── sample1
│   ├── ps34t.dat
│   └── a001.dat
├── sample2
│   ├── ps34t.dat
│   └── a001.dat
...
Without expert / domain knowledge, no distinction between original and derived data is possible anymore. Compare it to a case with a clearer separation of semantics:
/derived_dataset
├── sample1
│   └── ps34t.dat
├── sample2
│   └── ps34t.dat
├── ...
└── inputs
    └── raw
        ├── sample1
        │   └── a001.dat
        ├── sample2
        │   └── a001.dat
        ...
Additionally, the example above demonstrates a nesting strategy, where the input dataset is contained (or linked) within the output dataset, rather than placed alongside.
Full versus relative paths
A full path (absolute path) contains complete information of a file location. On Linux and MacOS it starts at the filesystem root:
/home/alice/Documents/project/figures/setup.png
/Users/bob/Documents/project/figures/setup.png
and on Windows it starts with a drive letter:
C:\\Users\eve\Documents\project\figures\setup.py
A relative path does not contain all these elements: as the name
suggests it is relative to some location (working directory). In the
Linux and MacOS examples below, if the current working directory is in
the project folder, the relative path is:
figures/setup.py
This has one important implication. If you move the project folder
between computers, the full paths will most likely change. Therefore,
if you write scripts for data analysis, you can make them much more
portable by only using relative paths (which will not depend on where
the project folder is) and launching them from the same working
directory on all computers.
Tip: use relative paths
Using relative paths in analysis code guarantees huge gains when moving it from one computer to another. Avoid hardcoding ‘/home/Alice’, or ‘/Users/Bob’, or ‘C://RawData/’. You can create the code directory in the top level of the dataset. Then, use relative paths, which won’t depend on where the dataset is placed. Alternatively, if you want the code to be in an entirely separate location, you can create a simple configuration file (using one of the text formats presented earlier), have your scripts read base paths from there and append the relative part. If the base paths change, only the config file will have to be edited.
Example structure: “research compendium”
A research project will usually contain data, code, and various kinds of text (protocols, reports, questionnaires, metadata) which need to be organised in some way. Take for example a “research compendium” as described in The Turing Way. A minimal example looks like this:
compendium/
├── data
│   ├── my_data.csv
├── analysis
│   └── my_script.R
├── DESCRIPTION
└── README.md
- Data and methods are separated into folders
- The required computational environment is described in a designated file.
- A README document provides a landing page (it’s easy to read by itself and most data hosting platforms will recognize it and display as formatted text)
A more comprehensive example looks like this:
compendium/
├── CITATION              <- instructions on how to cite
├── code                  <- custom code for this project
│   ├── analyze_data.R
│   └── clean_data.R
├── data_clean            <- intermediate data that has been transformed
│   └── data_clean.csv
├── data_raw              <- raw, immutable data
│   ├── datapackage.json
│   └── data_raw.csv
├── Dockerfile            <- computing environment recipe
├── figures               <- figures
│   └── flow_chart.jpeg
├── LICENSE               <- terms for reuse
├── Makefile              <- steps to automatically generate the results
├── paper.Rmd             <- text and code combined
└── README.md             <- top-level description
Side note: cookiecutter
If you find yourself needing to re-create the same structure over and over again, you might be interested in cookiecutter. Cookiecutter allows you to create files and folders based on a template (using your own or one that’s available) and user input.
Example structure: YODA principles
One of the YODA (YODA’s Organigram
on Data Analysis) principles says “structure study elements in modular
components to facilitate reuse within or outside the context of the
original study”. DataLad provides a yoda procedure for creating a
dataset. It creates a few basic elements to start with (and, as a side
note, sets the code directory, changelog and readme to be tracked by
git, and everything else annexed):
datalad create -c yoda "my_analysis"
tree
.
├── CHANGELOG.md
├── code
│   └── README.md
└── README.md
Note that in addition to a general readme there is a lower-level one in the code directory. Adding descriptions and explanations for people using the dataset is always a good idea. This minimal structure can be built up into something like this (example taken from the DataLad Handbook):
├── ci/                         # continuous integration configuration
│   └── .travis.yml
├── code/                       # your code
│   ├── tests/                  # unit tests to test your code
│   │   └── test_myscript.py
│   └── myscript.py
├── docs                        # documentation about the project
│   ├── build/
│   └── source/
├── envs                        # computational environments
│   └── Singularity
├── inputs/                     # dedicated inputs/, will not be changed by an analysis
│   └─── data/
│       ├── dataset1/           # one stand-alone data component
│       │   └── datafile_a
│       └── dataset2/
│           └── datafile_a
├── outputs/                    # outputs away from the input data
│   └── important_results/
│       └── figures/
├── CHANGELOG.md                # notes for fellow humans about your project
├── HOWTO.md
└── README.md
In this example, two data collections used as inputs are kept as independent components. Note that on the level of principles, this example is actually very similar to the research compendium above.
Example structure: BIDS
BIDS (Brain Imaging Data Structure) is an emerging standard for neuroimaging data organisation. It standardises patterns for file naming, directory structure, and metadata representation. This is part of an example dataset:
.
├── CHANGES
├── dataset_description.json
├── participants.tsv
├── README
├── sub-01
│   ├── anat
│   │   ├── sub-01_inplaneT2.nii.gz
│   │   └── sub-01_T1w.nii.gz
│   └── func
│       ├── sub-01_task-rhymejudgment_bold.nii.gz
│       └── sub-01_task-rhymejudgment_events.tsv
└── task-rhymejudgment_bold.json
Several aspects are worth noticing, as this example combines a number of elements discussed previously:
- There is a readme
- File names follow a key-value principle, with underscores and dashes
(the pattern here is
sub-<label>_[task-<name>]_modality) - Usage of text files where possible:
- tsv files are used to store participant tables and event timings.
- json files are used for metadata
- Sidecar metadata strategy: each .nii.gz (compressed binary file with imaging data) has an accompanying tsv file with timings of experimental events.
Key Points
Use filenames which are machine-readable, human readable, easy to sort and search
Avoid including identifying information in filenames from the get-go
Files can be categorized as text or binary
Lightweight text files can go a long way
A well thought-out directory structure simplifies computation
Be modular to facilitate reuse
Remote collaboration
Overview
Teaching: 45 min
Exercises: 45 minQuestions
How to create a DataLad dataset collaboratively?
How to publish a DataLad dataset?
How to consume a DataLad dataset?
Objectives
Exercise publishing and consuming data
Demonstrate the dissociation between a dataset and its contents
Prerequisites
GIN (G-Node Infrastructure) platform will be used for dataset publication. In order to fully complete the exercises, you will need a GIN account. The sign-up requires only a username, password, and a valid e-mail address (institutional e-mails are recommended to benefit from the full set of features).
Introduction
In the first module we covered the basics of local version control. We learned how to record changes that were made, and how to interact with the dataset history. We built a small dataset, with a record of operations which led to its current state. All these operations were done in a single location and by a single person.
However, research data rarely lives just on a single computer, and research projects aren’t single-person affairs. You may want to synchronise your data to a remote location for backup or archival. Having a remote storage, you may want to keep only a selection of files on your computer to save space (but also frequently rotate the files you have locally). You may want to use this storage to send data to your colleagues, and rely on version control to ensure that they are up to date. You may also want them to contribute to your dataset by adding new data or making some changes, which will be tracked. Finally, you may want to publish the dataset to some kind of a repository.
DataLad has tools to facilitate all these operations. In this module we will cover the basics of collaborative and remote work with datasets. We will start by publishing the dataset created during the first module. As a platform of our choice we will use GIN (G-Node Infrastructure).
We chose GIN because it provides a convenient way of hosting DataLad datasets. That being said, DataLad integrates with many providers and supports different scenarios – including those when hosting of dataset information and actual data is separated into two locations. Although each scenario will be slightly different, the setup steps that we will cover with GIN will look similar on other git-based hosting solutions.
Prelude: file availability, getting and dropping content
Before we proceed to data publishing let’s first take a look at the
dataset we created during the first module. We used two ways of adding
image files: some were downloaded, placed in the dataset “manually”,
while others were included using datalad download-url. We noted that
the latter records the file origin in a way that is not only
accessible to us, but also usable by DataLad. Let’s use this
information now.
The datalad drop command is used to drop file content from
datasets. It does not remove the file entirely - the information about
its presence and all associated history are maintained - it removes
the file content to save space, and only does so if the file can be
reobtained. Let’s use it on one of the files we got through
download-url.
Change the working directory to the dataset root (the folder which we
called my-dataset when the dataset was created) and then do:
datalad drop inputs/images/chinstrap_02.jpg
drop(ok): /home/alice/Documents/rdm-workshop/my-dataset/inputs/images/chinstrap_02.jpg
What are the results? The file is still visible (you can list files
with ls inputs/images or check the directory in your file browser),
but has no contents: you can try opening it (from your file browser or
with xdg-open if you’re on Linux) but this yields an error.
You can verify that this has freed up disk space by typing:
datalad status --annex all
5 annex'd files (5.4 MB/6.3 MB present/total size)
nothing to save, working tree clean
Let’s try dropping the file which we put in the dataset manually
(i.e. using wget and not datalad download-url):
datalad drop inputs/images/chinstrap_01.jpg
drop(error): /home/alice/Documents/rdm-workshop/example-dataset/inputs/images/chinstrap_01.jpg (file)
[unsafe; Could only verify the existence of 0 out of 1 necessary copy; (Use --reckless availability to override this check, or adjust numcopies.)]

# If you were to run this with DataLad version < 0.16.0, the safety check would be overridden with --nocheck instead of --reckless availability)
This time, DataLad refused to drop the file, because no information about its availability elsewhere has been recorded. The extra episode on removing files and datasets has a bit more context about this behavior.
The datalad get command is the reverse of datalad drop - it
obtains file contents from a known source. Let’s use it to reobtain
the previously dropped file:
datalad get inputs/images/chinstrap_02.jpg
get(ok): inputs/images/chinstrap_02.jpg (file) [from web...]
The output shows that it was reobtained from the stored URL. You can now verify that the file has its contents and can be opened again.
The datalad get / drop mechanism is used often. Soon, we will
demonstrate it in action with datasets downloaded from external
sources. However, you can already imagine its potential use cases. If
you have a dataset with many large files and a backup location, you
can use it to keep only part of its contents on your local machine
(e.g. laptop) while being aware of the bigger whole. With that in
mind, let’s move on to dataset publishing.
Publishing datasets to GIN
GIN (G-Node infrastructure) is a free data management system designed for comprehensive and reproducible management of scientific data. It is a web-based repository store and provides fine-grained access control to share data. GIN builds up on Git and git-annex, and is an easy alternative to other third-party services to host and share your DataLad datasets. It allows sharing datasets and their contents with selected collaborators or making them publicly and anonymously available. And even if you prefer to expose and share your datasets via GitHub, you can still use Gin to host your data.
Configuration (SSH keys)
To participate in the following part you should have registered an account on GIN. Before we are able to start sending data, we need to configure our access. This will require a little bit of explanation.
The data transfer to and from GIN (and other git-based platforms, such as GitHub or GitLab) can be done based on two protocols, https (the same as used by web browsers to access websites) and ssh (typically used for command line access to remote computers). The https access uses a combination of user name and password for authentication. For GIN, it cannot be used to transfer annexed file content. For this reason, we will prefer the ssh protocol. The authentication is based on SSH keys - pairs of text files with seemingly random content, called a private and public key. The public key is shared with a server, while the private one is kept on a local computer. They are generated so that it is easy to verify ownership of one based on the other, but virtually impossible to forge it.
Note on Binder (no ssh)
If you are working from the DataLad Binder, you will not be able to use the ssh protocol, as it is disabled. You can skip the key generation part, and replace all URLs below with their https counterparts (i.e.
https://gin.g-node.org/instead ofgit@gin.g-node.org:/). This will not allow you to transfer the annexed files content, but at least you will be able to transfer file information and non-annexed text files.
To generate the SSH keys, we will follow the GitHub guides on checking for existing and generating new keys. The summary below applies to Linux.
You may already have an SSH key and may want to use it. To check for
existing keys, enter ls -al ~/.ssh to check the contents of the
folder where they are typically stored. By default, a public key file
would be named id_rsa.pub, id_ecdsa.pub or id_ed25519.pub (the
names refer to the algorithms used to generate key pairs). If you
don’t see such files, or the ~/.ssh folder does not exist, you will
need to generate a new pair.
To generate, use the following command (replacing the placeholder with the e-mail used to register on GIN):
ssh-keygen -t ed25519 -C "your_email@example.com"
When prompted, accept the default location and choose a password to protect the key. You may use no password by accepting an empty one. However, especially on a shared machine, setting a password is recommended, because it guarantees that a person who gets hold of the key cannot use it without knowing the password.
Then, you can add the key to the ssh-agent, a helper program running
in the background. First, start the agent if necessary with eval
"$(ssh-agent -s)" and add the key with ssh-add ~/.ssh/id_ed25519
(if you chose a different name or location, use it instead).
Finally, you can add the public key to GIN. Log in to the web
interface, go to settings (click on your avatar in upper right and
choose “Your Settings”), then select SSH keys in the menu on the left,
and click “Add Key”. This will open a form with two fields. In “Key
Name”, enter something that you will recognise (eg. “Work laptop” or
“RDM workshop hub”). In “Content”, paste the content of the public key
file. To get it, you can display the file and copy its content, or do
it with a single command: pbcopy < ~/.ssh/id_ed25519.pub. After
pasting the key, click the “Add key” button.
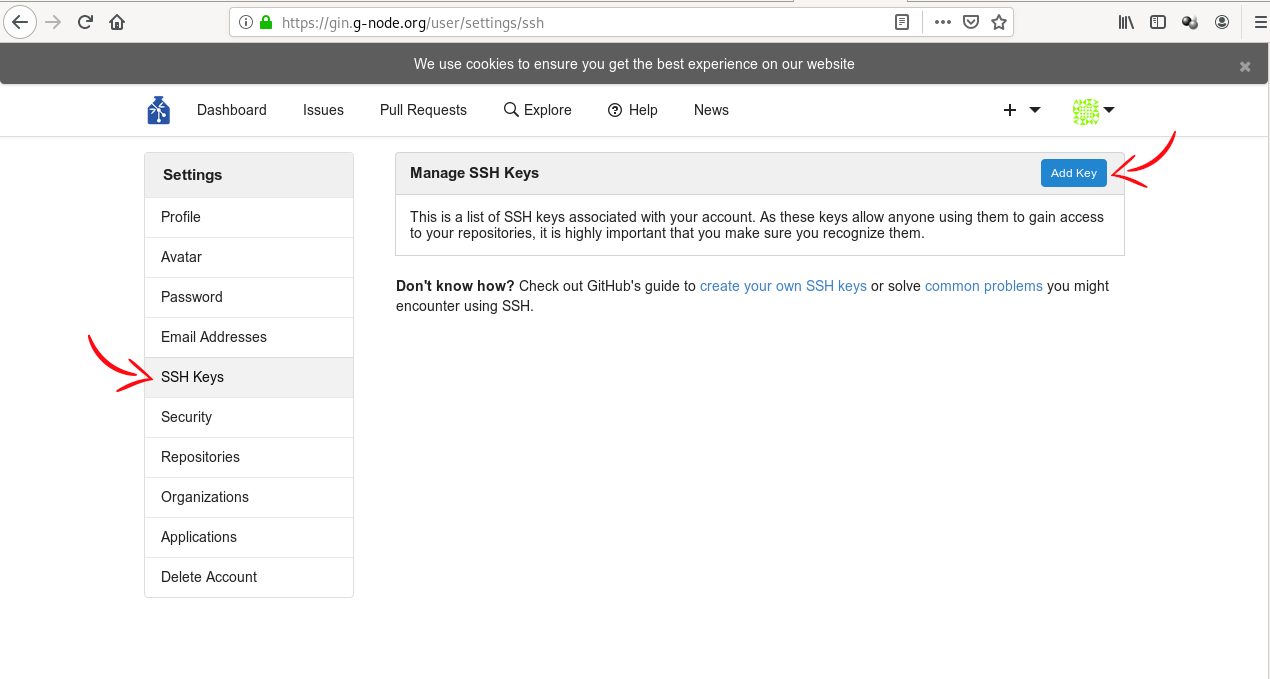
(Image from DataLad Handbook)
Publishing to GIN (datalad push)
Create an empty repository on GIN
We have our dataset, we configured our access, and we are ready to
publish. To do so, we first need to create a repository - a place on
GIN where things will be stored.
This can either be done via GIN’s web interface, or, when you run DataLad version
0.16 or higher, via the create-sibling-gin command.
Pick whichever route seems more attractive to you.
Route 1: Create a repo via web interface
Go to gin.g-node.org. Click the plus button on the upper right and select “New Repository”. Then, enter a repository name (one word, no spaces, but dashes and underscores are allowed). You can, optionally, add a short description in “Title”. In the “Initial files” section, uncheck the “Initialize this repository with selected files and template” checkbox - we want the repository to be empty. Finally, click the button “Create Repository”.
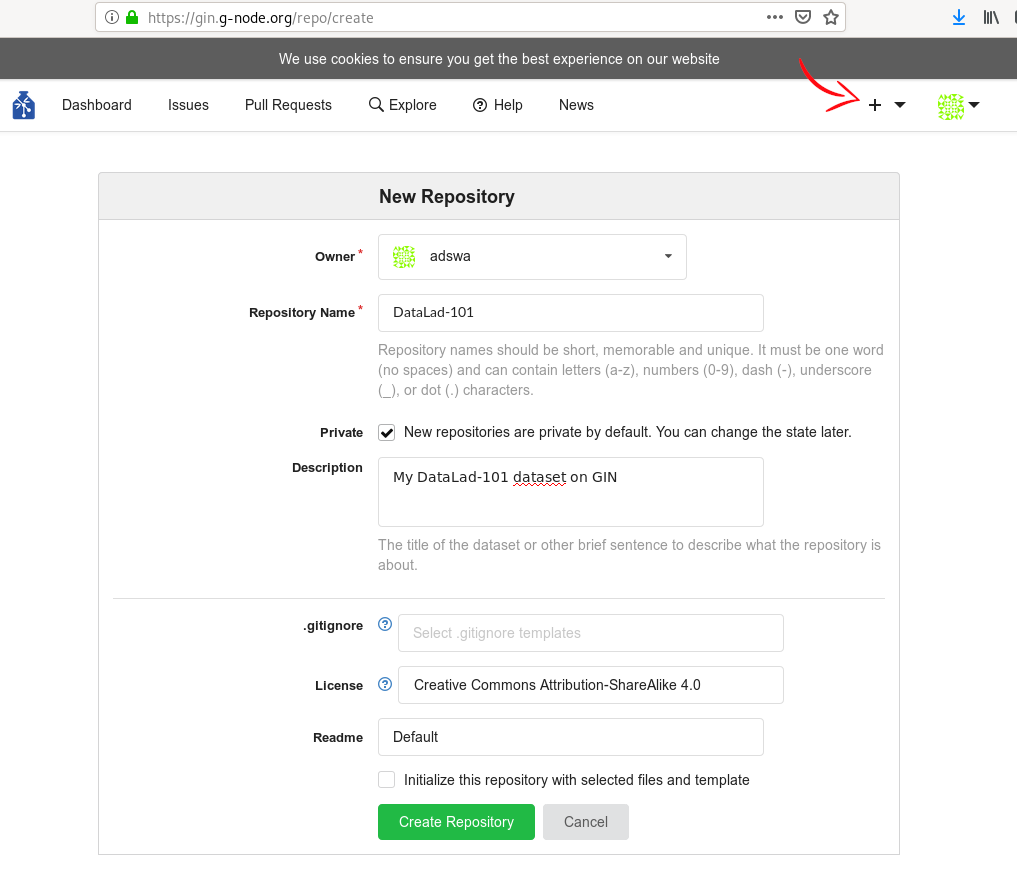
(Image from DataLad Handbook)
Afterwards, add the GIN repository as a
sibling of your dataset. To do so, use datalad siblings add,
substituting your user name and dataset name below (note that the URL
is displayed for you on the GIN website after creating the
repository). Note that since this is the first time you will be
connecting to the GIN server via SSH, you will likely be asked to
confirm to connect. This is a safety measure, and you can type “yes”
to continue.
datalad siblings add \
    --dataset . \
    --name gin \
    --url git@gin.g-node.org:/username/dataset-name.git
[INFO   ] Could not enable annex remote gin. This is expected if gin is a pure Git remote, or happens if it is not accessible.
[WARNING] Could not detect whether gin carries an annex. If gin is a pure Git remote, this is expected.
.: gin(-) [git@gin.g-node.org:/username/rdm-workshop.git (git)]
The command took three arguments, dataset (which dataset is being
configured, . means “here”), name is the name by which we will
later refer to the sibling, and url is the address for transferring
the data.
Route 2: Create a repo using create-sibling-gin
The create-sibling-gin command automates repository creation from the command line for Gin.
You can provide it with a name for your sibling (-s/--name gin) and a name under which the
repository will be created (make sure that no repository with this name exists yet).
datalad create-sibling-gin --name gin my-dataset
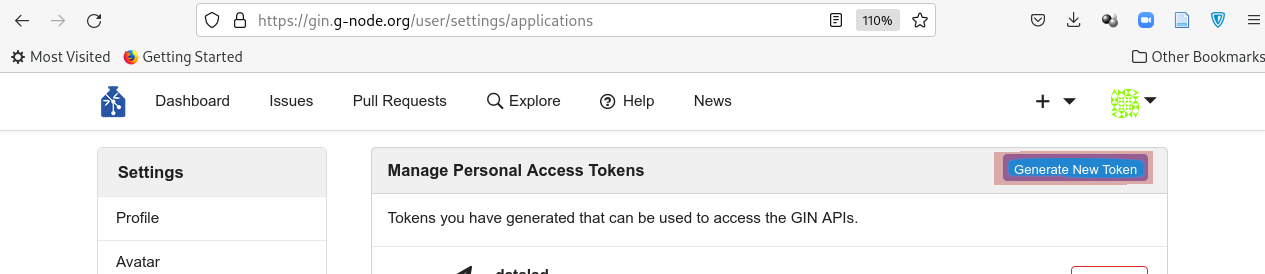
If it is your first time running this command, DataLad will ask for a token. This token provides authentication and permission to create new repositories under your user account.
An access token is required for https://gin.g-node.org. Visit https://gin.g-node.org/user/settings/applications to create a token
token:
The link above should take you to your accounts’ settings, where you will be able to click “Generate new token”:
Choose a meaningful and unique name:
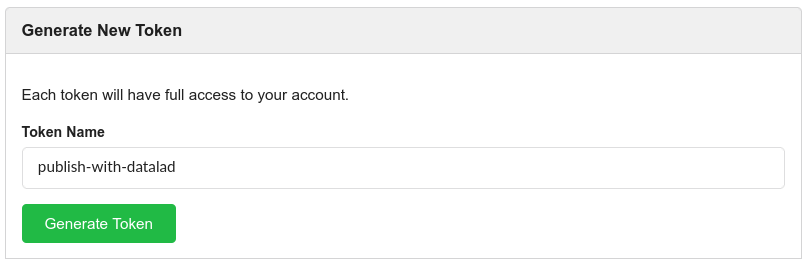
And copy the token into the command line prompt. DataLad will store the token in your system’s password manager, but it can be useful to make a note of the token if you are not using your personal computer to run this code.

 datalad create-sibling-gin -s gin mydataset
An access token is required for https://gin.g-node.org. Visit https://gin.g-node.org/user/settings/applications to create a token
token:
create_sibling_gin(ok): [sibling repository 'gin' created at https://gin.g-node.org/adswa/mydataset]
configure-sibling(ok): . (sibling)
action summary:
  configure-sibling (ok: 1)
  create_sibling_gin (ok: 1)
Afterwards, there will be a new repository on Gin and your dataset will know it as a sibling under the name gin.
If it is the first time connecting to Gin, you might be prompted to approve the connection to a new host.
datalad siblings
The authenticity of host 'gin.g-node.org (141.84.41.219)' can't be established.
ED25519 key fingerprint is SHA256:z+QGH+2gmb07ZpjRxRKW+Msge5PDR8O+y1p6qQR54qg.
This key is not known by any other names
Are you sure you want to continue connecting (yes/no/[fingerprint])? yes
.: here(+) [git]
[WARNING] Could not detect whether gin carries an annex. If gin is a pure Git remote, this is expected.
.: gin(-) [https://gin.g-node.org/adswa/mydataset (git)]
Alternatively, run git remote -v to list known siblings:
git remote -v
gin     https://gin.g-node.org/adswa/mydataset (fetch)
gin     git@gin.g-node.org:/adswa/mydataset.git (push)
Publish your dataset
If you have created a new repository on Gin and registered it as a sibling of
your dataset via one of two routes outlined above, you can publish your
dataset with datalad push, using the sibling name together with the --to
option:
datalad push --to gin
datalad push --to gin
copy(ok): inputs/images/chinstrap_01.jpg (file) [to gin...]
copy(ok): inputs/images/chinstrap_02.jpg (file) [to gin...]
copy(ok): inputs/images/king_01.jpg (file) [to gin...]
copy(ok): outputs/images_greyscale/chinstrap_01_grey.jpg (file) [to gin...]
copy(ok): outputs/images_greyscale/chinstrap_02_grey.jpg (file) [to gin...]
publish(ok): . (dataset) [refs/heads/git-annex->gin:refs/heads/git-annex 80ef82a..af7d450]
publish(ok): . (dataset) [refs/heads/main->gin:refs/heads/main [new branch]]
action summary:
  copy (ok: 5)
  publish (ok: 2)
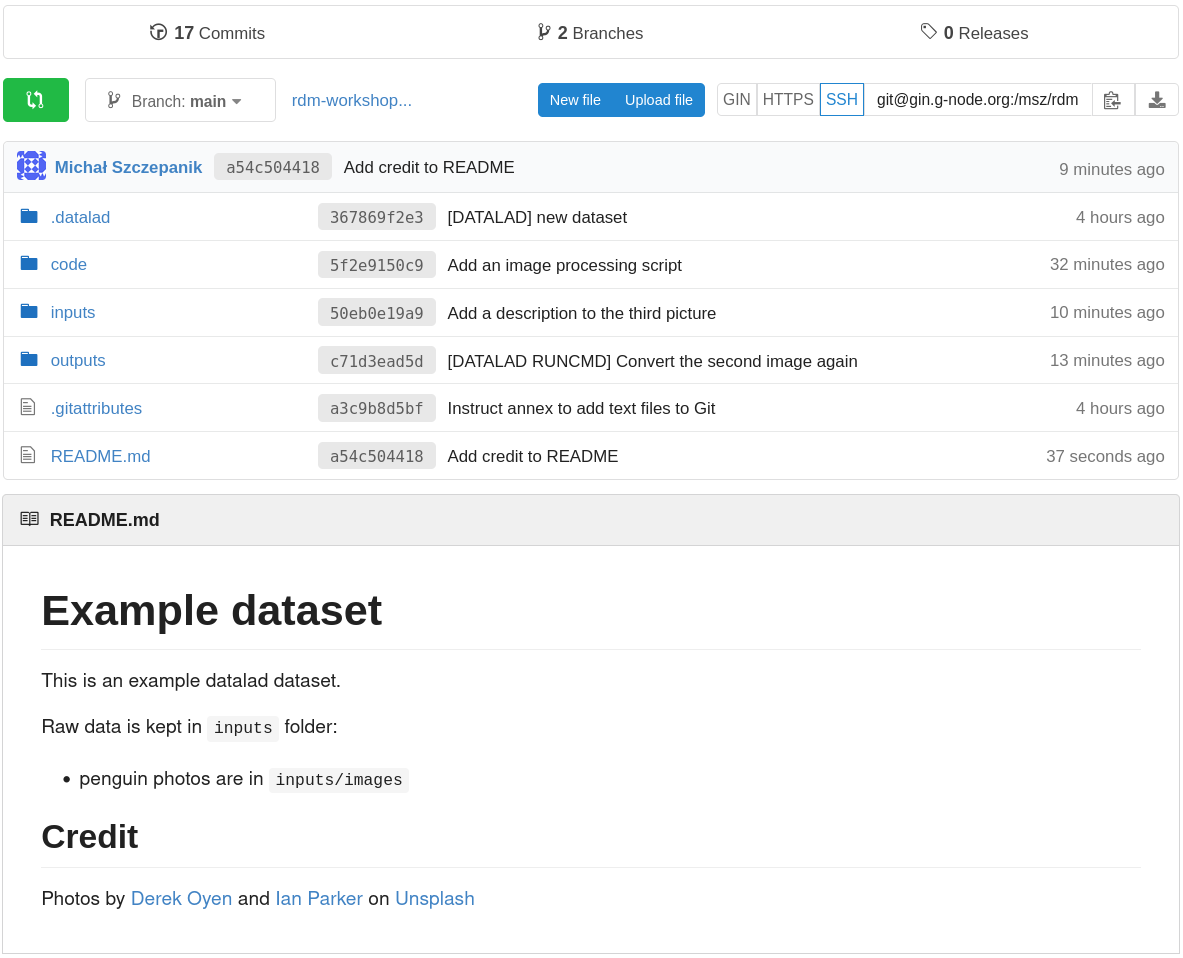
If you now refresh the GIN website, you will find all of your dataset there (note: if the file names look cryptic and you see “Branch: git-annex” above the files, pick another branch, likely called “main”; to make this choice permanent, you can go to repository “Settings”, pick “Branches”, and select a default branch – this is dependent on your git configuration). Observe, that:
- the README is displayed under the list of files,
- you can click on files to view their content.
Finally, going back to the command line, you can use the datalad
siblings command to report all known dataset siblings. In this case
there are two: one called here (obviously) and one called gin (the
one we added). The (+) symbols mean that both store annexed content:
datalad
siblings
.: here(+) [git]
.: gin(+) [git@gin.g-node.org:/username/rdm-workshop.git (git)]
Data consumption: datalad clone
With the dataset published, we can now switch our perspective to that of a data consumer. Obtaining a copy of a dataset is called cloning. To try it out, let’s change our working directory outside the dataset. Assuming we’ve been at the dataset root, we can navigate to its parent directory:
cd ..
Then, we can clone the dataset using the SSH URL (the same which we
used to publish the data). For your convenience, the URL is displayed
above the file list on GIN. Let’s name the cloned dataset
cloned-dataset to distinguish it from the original (by default,
the datalad clone command uses the name of the repository):
datalad clone git@gin.g-node.org:/username/dataset-name.git cloned-dataset
install(ok): /home/alice/Documents/rdm-warmup/cloned-dataset (dataset)
Note. By default, repositories on GIN are created as private, meaning that they are accessible only to their owner and, potentially, other users who were explicitly granted that access. A repository can also be made public, meaning that it’s accessible (for download) to anybody. Here, we are cloning our own repository, so we can access it freely regardless of settings.
Let’s look inside.
cd cloned-dataset
- First, we can see that the history is present (
tig). - We can list (
ls) the files. - We can view (e.g.
cat README.md) the content of text files (reminder: when creating the dataset we configured them not to be annexed). - We cannot view the content of the annexed image files (linux:
xdg-open
inputs/images/...).
That’s because clone operation does not download the annexed
content. In other words, for annexed files it only retrieves file
information (which can be very convenient - we can see what’s in the
dataset and then selectively download only the content we need). We
can confirm that this is the case by asking about the annex status:
datalad status --annex all
5 annex'd files (0.0 B/6.3 MB present/total size)
nothing to save, working tree clean
We have already encountered the get command, and here we will use it
again. First, however, let’s take a look at the output of another
command to see what DataLad knows about file availability:
git annex whereis inputs/images/chinstrap_02.jpg (3 copies)
whereis inputs/images/chinstrap_02.jpg (3 copies)
  	00000000-0000-0000-0000-000000000001 -- web
   	7775655c-b59d-4e58-938c-698d2205d46a -- git@8242caf9acd8:/data/repos/msz/rdm-workshop.git [origin]
   	b228d597-3217-45a5-9831-6f10f00a1611 -- My example dataset

  web: https://unsplash.com/photos/8PxCm4HsPX8/download?force=true
ok
This is one of the files originally added through datalad
download-url, and this information was preserved - the first line lists
“web” as source, and the exact link is shown at the bottom. Next,
there is a line labeled “origin”, which means the location from which
the dataset was cloned. And finally, there is the current dataset.
With this knowledge, let’s get the file content:
datalad get inputs/images/chinstrap_02.jpg
get(ok): inputs/images/chinstrap_02.jpg (file) [from origin...]
Now we can verify that the file content is present by opening it. Success!
Update the dataset
Let’s imagine a situation when there’s an update to a dataset’s content: either a new file is added, or a change is made to an existing one. In both cases, the mechanism for sharing the change will be the same. Let’s simulate this situation from the side of the original dataset.
We finished the first module by adding a new image file, which we did not convert to monochrome like the previous ones. Let’s navigate back to the original dataset and do the conversion:
cd ../my_dataset
# if using a virtual environment:
# source ~/.venvs/rdm-workshop/bin/activate
datalad run \
--input inputs/images/king_01.jpg \
--output outputs/images_greyscale/king_01_grey.jpg \
-m "Convert the third image" \
python code/greyscale.py {inputs} {outputs}
[INFO ] Making sure inputs are available (this may take some time)
[INFO ] == Command start (output follows) =====
[INFO ] == Command exit (modification check follows) =====
add(ok): outputs/images_greyscale/king_01_grey.jpg (file)
save(ok): . (dataset)
This created a new file in outputs (always good to check it and see
that the history got updated). To publish the change (update the
external repository) we can use the same command that we used when
publishing the dataset for the first time, i.e. datalad push:
datalad push --to gin
copy(ok): outputs/images_greyscale/king_01_grey.jpg (file) [to gin...]
publish(ok): . (dataset) [refs/heads/git-annex->gin:refs/heads/git-annex 4e1950b..bb7f8dd]
publish(ok): . (dataset) [refs/heads/main->gin:refs/heads/main 6e75962..84f56f9]
action summary:
copy (ok: 1)
publish (ok: 2)
In the output we can see that only the new file was copied - datalad was aware that other files remained unchanged and did not reupload them.
Let’s now switch back to the clone. The command for incorporating
changes from a sibling is datalad update, additionally specifying
the source location via the -s option and the type of update via
the --how option:
cd ../cloned-dataset
datalad update -s origin --how merge
[INFO ] Fetching updates for Dataset(/home/alice/Documents/rdm-workshop/cloned-dataset)
merge(ok): . (dataset) [Merged origin/main]
update.annex_merge(ok): . (dataset) [Merged annex branch]
update(ok): . (dataset)
action summary:
merge (ok: 1)
update (ok: 1)
update.annex_merge (ok: 1)
As with datalad clone, we can:
- see that the history is updated (
tig) - see the file can be listed (
ls outputs/images_greyscale)
We could also get this file like any other. However, let’s try
something else - recomputing the result.
Rerun an operation
In this case, the output image is stored in GIN and we could simply
use datalad get to obtain it. However, imagine that we are
interested in reproducing its generation (maybe we have a newer
version of the image processing software, or maybe we had removed all
copies of the output file to save space). When converting the third
image, we used datalad run. This command preserves inputs, outputs,
and the command being used, paving the way for automatic recomputation.
Use tig to view the last commit message and copy (part of) its
shasum. Then, give it to datalad rerun:
datalad rerun 84f56f
[INFO ] run commit 84f56f9; (Convert the third...)
[INFO ] Making sure inputs are available (this may take some time)
get(ok): inputs/images/king_01.jpg (file) [from origin...]
run.remove(ok): outputs/images_greyscale/king_01_grey.jpg (file) [Removed file]
[INFO ] == Command start (output follows) =====
[INFO ] == Command exit (modification check follows) =====
add(ok): outputs/images_greyscale/king_01_grey.jpg (file)
action summary:
add (ok: 1)
get (ok: 1)
run.remove (ok: 1)
save (notneeded: 1)
Notice that we did not have to get the input file in advance - the
(re)run command did that on its own. The datalad run command, when
given both --input and --output argument does the following:
- gets the inputs
- unlocks the outputs (to make sure that they are writable)
- saves the dataset after completion
Consequently, the same is done by datalad rerun.
Interim summary: interacting with remote datasets

(Image from DataLad Handbook)
In the examples above we went through the basic operations for interaction with remote datasets. A basic workflow involves:
- creating a sibling dataset to publish or update from:
datalad create-sibling - publishing the dataset:
datalad push - consuming an existing dataset:
datalad clone - obtaining annexed file content:
datalad get - keeping siblings in sync:
datalad update
This is a core procedure, and can be flexibly adjusted to many contexts. In the example above, we created a dataset in one folder, published it to GIN, and cloned into another folder, collaborating only with ourselves. By itself, this is not very practical, but all the steps would be identical if the clone was on another computer. For example, we could follow this process to keep our laptop and desktop computer in sync (while also having a backup on GIN). Or we could prototype our analysis on a laptop, run it on a shared server or cluster, and get back the outputs. In this way, the workflow can be very useful even when working alone.
That being said, the real joy of remote dataset storage comes with
collaboration. In this scenario, GIN could function as a central
storage, with which several people could interact, adding and
retrieving content. The push and update operations are the same as
previously, but they can be done by different people. Since the
dataset history (with authorship information and commit messages) is
recorded and can be automatically updated, communicating and sharing
changes is greatly simplified.
In the remainder of this module we will exercise such collaboration.
Exercise: remote collaboration
Preparation
Divide participants in pairs, ask to add each other as contributors and clone each other’s dataset.
Changing a cloned dataset
With a cloned dataset, you can do the following:
- Change a (text) file. For example, in the
inputs/images/chinstrap_02.yamlfile we enteredpenguin_count: 2, but if you look closely at the related photograph, there are actually three penguins (one is partially behind a rock). Edit the file and save the changes with an informative commit message, such as “Include penguins occluded by rocks in the count” or something similar. - Add a file. For example, you can use
datalad download-urlto get one of the following pictures (all by Ian Parker on Unsplash). Don’t forget to add a meaningful message!- Gentoo penguins in a sandstorm, download URL:
https://unsplash.com/photos/ptcOlmmtb8w/download?force=true - King penguin backlit by setting sun, download URL:
https://unsplash.com/photos/TLcLDigmTKE/download?force=true - King penguins diving, download URL:
https://unsplash.com/photos/PzAmR_Nt7KM/download?force=true
- Gentoo penguins in a sandstorm, download URL:
- Use
datalad runto create a new file inoutputs/images_greyscale. Convert the newly added image to greyscale using the same method we used for the previous images. - If you want to practice saving, edit more files. For example you can add a location key-value pair to the yaml files. For files from the original dataset, chinstrap penguins were photographed on Two Hummock Islands, and king penguins (king_01.jpg) on Falkland Islands. For the files listed above, two of them on list the location on the website.
Contributing back
When ready, you can contribute back with datalad push. If the other
person has granted you access to their repository (as should be the
case during the workshop), you can do it right away. Note that in this
case you are pushing to origin - this is a default name given to a
sibling when cloning (you can verify the destination first with
datalad siblings):
datalad push --to origin
If the owner hadn’t granted you write access, you would need to submit a pull request - basically make your own copy of their dataset on GIN, push your changes to your copy, and use an automated process to ask them to incorporate your changes. This is a standard procedure for all collaboration based on git (works similarly on GitHub, GitLab, etc.) and it’s a very satisfying process, but we won’t cover it during this workshop.
Getting the contributions locally
When your remote dataset has been modified, you can update your local
copy with the following (note that we are updating from gin because
that’s how we named the sibling when adding it for first publication):
datalad update -s gin --how merge
Key Points
A dataset can be published with
datalad pushA dataset can be cloned with
datalad cloneThe clone operation does not obtain annexed file content, the contents can be obtained selectively
Annexed file contents can be removed (
drop) and reobtained (get) as long as a copy exists somewhereA dataset can be synchronised with its copy (sibling) with
datalad updateGIN is one of the platforms with which DataLad can interact
GIN can serve as a store for both annexed and non-annexed contents
Dataset management
Overview
Teaching: 45 min
Exercises: 45 minQuestions
How to manage data on a dataset level?
How to link two datasets?
When can multi-level datasets be useful?
Objectives
Demonstrate dataset nesting (subdatasets)
Investigate a nested dataset “in the wild”
Create a simple model of a nested dataset
Introduction
The simplest analysis takes some input data, and produces output data. However, the same input dataset can be used in multiple analyses, and output (e.g. transformed or preprocessed) data produced by one analysis may serve as input for subsequent analysis.
To address these use cases, DataLad provides a mechanism for linking datasets (Image from DataLad Handbook):

You may be interested in subdatasets if:
- there is a logical need to make your data modular (eg. raw data - preprocessing - analysis - paper)
- there is a technical need to do so (with data in the order of hundreds of thousands of files, splitting them into subdatasets will improve performance).
In this module, we will take a closer look at this mechanism.
Real-life example: using nested datasets
We will work with the Highspeed analysis dataset containing data and code from:
Wittkuhn, L., Schuck, N.W. Dynamics of fMRI patterns reflect sub-second activation sequences and reveal replay in human visual cortex. Nat Commun 12, 1795 (2021). https://doi.org/10.1038/s41467-021-21970-2
Let’s start by inspecting the dataset’s GitHub page. Observe the following.
- The dataset is hosted on GitHub, a popular platform for git storage without annexed content. Publishing the dataset on GitHub and file content elsewhere is a common scenario for DataLad.
- The README provides an overview of the content, hinting that the
datafolder contains input datasets. - If you navigate to
code, you will see that most files with R code are there, hosted on GitHub. - If you navigate to
data, you will see links that take you to other GitHub repositories (technical detail - this is how GitHub displays submodules). - Side note: if you go to one of the data directories, and navigate all the way to a single
.nii.gzorpngfile, you will see GitHub showing that it is a symlink, not an actual data file. - Try for example navigating to
highspeed-decoding/decoding/sub-01/plots/sub-01_run-01_tmap_masked.png: it’s a symbolic link pointing to.git/annex/objects.... Let’s see if we have the ability to obtain this file through DataLad.
Both the README content and the existence of submodules told us that we are dealing with subdatasets. But we could learn the same through DataLad after installing the dataset. Let’s install:
datalad clone https://github.com/lnnrtwttkhn/highspeed-analysis.git
[INFO   ] scanning for annexed files (this may take some time)
[INFO   ] Remote origin not usable by git-annex; setting annex-ignore
[INFO   ] https://github.com/lnnrtwttkhn/highspeed-bids.git/config download failed: Not Found
[INFO   ] access to 1 dataset sibling keeper not auto-enabled, enable with:
| 		datalad siblings -d "/home/alice/Documents/rdm-course/highspeed-analysis" enable -s keeper
install(ok): /home/alice/Documents/rdm-course/highspeed-analysis (dataset)
Now, let’s change directory into the dataset and ask about its subdatasets:
cd highspeed-analysis
datalad subdatasets
subdataset(ok): code/raincloud-plots (dataset)
subdataset(ok): data/bids (dataset)
subdataset(ok): data/decoding (dataset)
Our goal is to retrieve a file from the “decoding” (sub)dataset.
If we try to list its contents, we see… nothing:
ls data/decoding/
Think of it this way: a subdataset is a logically separate entity, and you probably don’t need its contents from the outset.
To work with a subdataset, we need to install it.
Subdatasets can be installed with the already familiar datalad get command.
In this case we want to use --no-data to only obtain placeholders for annexed files.
Without the --no-data option we would start downloading what could potentially be a
ton of files. Instead, we’ll just get an overview, and datalad get the specific file
afterwards.
datalad get --no-data data/decoding
[INFO   ] scanning for annexed files (this may take some time)
[INFO   ] Remote origin not usable by git-annex; setting annex-ignore
[INFO   ] https://github.com/lnnrtwttkhn/highspeed-decoding.git/config download failed: Not Found
install(ok): /home/jupyter-mslw/highspeed-analysis/data/decoding (dataset) [Installed subdataset in order to get /home/alice/Documents/rdm-course/highspeed-analysis/data/decoding]
Now we can list the contents:
ls data/decoding
CHANGELOG.md LICENSE README.md bids code datacite.yml decoding fmriprep glm highspeed-decoding.Rproj logs masks
Let’s get the file we wanted (the first plot from the first subject):
datalad get data/decoding/decoding/sub-01/plots/sub-01_run-01_tvalue_distribution.png
get(ok): data/decoding/decoding/sub-01/plots/sub-01_run-01_tmap_masked.png (file) [from gin...]
We successfully obtained the file from the subdataset and can view it.
Why does this matter? The file we opened was, seemingly, a diagnostic image for visual quality control. In a high-level dataset (statistical analysis, paper…) we are probably not very interested in the raw data. However, it’s convenient to have an easy way to retrieve the low-level dataset when needed.
Toy example: creating subdatasets
Let’s try to build a nested dataset from scratch. We will stick with the theme set in the previous episodes. This time, our goal is to write a short report on penguins, based on the data made available by Palmer Station Antarctica LTER and dr Kristen Gorman (see also: palmerpenguins R dataset). Let’s say we want to investigate the relationship between flipper length and body mass in three different penguin species.
We will:
- Create a main dataset for our report, and create a subdataset within which to store inputs
- Populate the subdataset with data
- Run an analysis, producing a figure in the main dataset
- Write our “report”
This is the folder structure we’re aiming for:
penguin-report/
├── figures
│   └── lmplot.png
├── inputs
│   ├── adelie.csv
│   ├── chinstrap.csv
│   └── gentoo.csv
├── process.py
├── report.html
└── report.md
Create a dataset within a dataset
Let’s start by creating our main dataset and changing our working directory.
We’re using the text2git configuration again:
datalad create -c text2git penguin-report
cd penguin-report
Then, let’s create a subdataset, this time without text2git, and name it inputs.
The -d/--dataset option is very important: it tells DataLad to create a new subdataset and register it in the given parent dataset.
datalad create -d . inputs
[INFO   ] Creating a new annex repo at /home/jupyter-mslw/penguin-report/inputs
add(ok): inputs (file)
add(ok): .gitmodules (file)
save(ok): . (dataset)
create(ok): inputs (dataset)
At this point it’s worthwhile checking tig to see the nature of the last change.
The command created one commit, titled [DATALAD] Recorded changes.
If we view the details of the commit (hit Enter), we see that the parent dataset was affected in two places:
an entry was created in the hidden .gitmodules files, and for the inputs folder, a subproject commit was recorded.
This is all the information the parent dataset stores about the subdataset.
    [DATALAD] Recorded changes
---
 .gitmodules | 4 ++++
 inputs      | 1 +
 2 files changed, 5 insertions(+)

diff --git a/.gitmodules b/.gitmodules
new file mode 100644
index 0000000..d5cf43d
--- /dev/null
+++ b/.gitmodules
@@ -0,0 +1,4 @@
+[submodule "inputs"]
+       path = inputs
+       url = ./inputs
+       datalad-id = 16d66558-93d5-415b-b059-af680f2040fc

diff --git a/inputs b/inputs
new file mode 160000
index 0000000..b9c6cc5
--- /dev/null
+++ b/inputs
@@ -0,0 +1 @@
+Subproject commit b9c6cc5fd918a8aba3aa3e06c5e1c7fdae176ba8
For the following commands we will be explicit with the -d/--dataset argument, and always specify on which dataset we want to act.
Populate the input dataset
Download contents
In our input dataset we want to include tabular data with size measurements of Adelie, Gentoo, and Chinstrap penguins.
datalad download-url -d inputs -m "Add Adelie data" -O inputs/adelie.csv https://pasta.lternet.edu/package/data/eml/knb-lter-pal/219/5/002f3893385f710df69eeebe893144ff
datalad download-url -d inputs -m "Add Gentoo data" -O inputs/gentoo.csv https://pasta.lternet.edu/package/data/eml/knb-lter-pal/220/7/e03b43c924f226486f2f0ab6709d2381
datalad download-url -d inputs -m "Add Chinstrap data" -O inputs/chinstrap.csv https://pasta.lternet.edu/package/data/eml/knb-lter-pal/221/8/fe853aa8f7a59aa84cdd3197619ef462
Let’s preview one csv file to see what content we’re dealing with.
An easy way to do so without leaving the command line is with the head command, which will print the first n lines of a text file (default n=10):
head -n 2 inputs/adelie.csv
studyName,"Sample Number",Species,Region,Island,Stage,"Individual ID","Clutch Completion","Date Egg","Culmen Length (mm)","Culmen Depth (mm)","Flipper Length (mm)","Body Mass (g)",Sex,"Delta 15 N (o/oo)","Delta 13 C (o/oo)",Comments
PAL0708,1,"Adelie Penguin (Pygoscelis adeliae)",Anvers,Torgersen,"Adult, 1 Egg Stage",N1A1,Yes,2007-11-11,39.1,18.7,181,3750,MALE,,,"Not enough blood for isotopes."
If you are working in JupyterLab, you can conveniently preview the file by double-clicking it in the file browser.
See where changes got recorded
Checking the history with tig shows us that there is no record of these commits (“Add … data”) in the parent dataset!
tig
2022-01-11 10:40 Unknown o Unstaged changes
2022-01-11 10:19 Alice   o [master] [DATALAD] Recorded changes
2022-01-11 10:18 Alice   o Instruct annex to add text files to Git
2022-01-11 10:18 Alic    I [DATALAD] new dataset
Moreover, datalad status only reports that the subdataset has changed, without listing the individual files.
datalad status
modified: inputs (dataset)
However, if we change into the subdataset, we can see its history (and none of the parent dataset).
cd inputs
tig
2022-01-11 10:34 Alice o [master] Add Chinstrap data
2022-01-11 10:34 Alice o Add Gentoo data
2022-01-11 10:34 Alice o Add Adelie data
2022-01-11 10:19 Alice I [DATALAD] new dataset
Also, datalad status reports that the subdataset’s working tree is clean, with nothing to save:
datalad status
nothing to save, working tree clean
Let’s get back to the parent dataset
cd ..
Record the change in the parent dataset
In the parent dataset, datalad status shows that there was some change in the subdataset: modified: inputs (dataset).
To check what this looks like, let’s do git diff:
git diff
diff --git a/inputs b/inputs
index b9c6cc5..a194b15 160000
--- a/inputs
+++ b/inputs
@@ -1 +1 @@
-Subproject commit b9c6cc5fd918a8aba3aa3e06c5e1c7fdae176ba8
+Subproject commit a194b15d6b26c515f970480f7f66e92e4fd9b4c2
From the parent dataset (superdataset) perspective, only the subproject commit has changed (if you went back into the subdataset and look at its history you could see that this is indeed the shasum of the latest commit). This is important: a superdataset does not record individual changes within the subdataset, it only records the state of the subdataset. In other words, it points to the subdataset location and a point in its life (indicated by a specific commit).
Let’s acknowledge that we want our superdataset to point to the updated version of the subdataset (ie. that which has all three tabular files) by saving this change in the superdataset’s history. In other words, while the subdataset progressed by three commits, in the parent dataset we can record it as a single change (from empty to populated subdataset):
datalad save -d . -m "Progress the subdataset version"
add(ok): inputs (file)
save(ok): . (dataset)
At this stage, our superdataset stores the reference to a populated inputs dataset.
Separate history
- The super- and sub-datasets have separate histories
- The superdataset only contains a reference to a specific commit in the subdataset’s history
- If the subdataset evolves, the reference in the superdataset can be updated (this has to be done explicitly)
Installing subdatasets
- Usually, you would install an already existing dataset as a subdataset with
datalad clone -d . ...rather than create it from scratch like we just did- The end effect would be the same, with the parent dataset pointing at the specific state of the subdataset
Add a processing script to the parent dataset
Let’s proceed with our subdatasets use case.
Create a file process.py in the root of the parent dataset (we can do away with the code directory for simplicity) and paste the following:
import argparse
import pandas
import seaborn
from pathlib import Path

# Command line arguments
parser = argparse.ArgumentParser()
parser.add_argument('--data', nargs='+', help='csv data file(s) to analyse')
parser.add_argument('--figure', help='file to store resulting plot')
args = parser.parse_args()

# Create output directory if needed
fig_path = Path(args.figure)
if not fig_path.parent.exists():
    fig_path.parent.mkdir(parents=True)

# Load and concatenate input tables
tables = [pandas.read_csv(f) for f in args.data]
penguins = pandas.concat(tables)

# Plot data and regression model fits
g = seaborn.lmplot(
    x="Flipper Length (mm)",
    y="Body Mass (g)",
    hue="Species",
    height=7,
    data=penguins,
)

# Save the plot
g.savefig(fig_path)
The script is written in a way that:
- it takes one or more csv files as
--dataargument - it produces a linear model (correlation) plot of body mass vs flipper length
- it saves the plot in the file specified as
--outputargument
Then commit the file to the superdataset history:
datalad save -d . -m "Add code" process.py
Run the analysis
We’ll use datalad run to create a record of data processing in the superdataset.
Here, we are providing the --input option several times with different files, and referring to all of them with the {inputs} placeholder.
The caveat is that when we are doing so, we need to put the run command in quotes (ie. as a string) so that the expanded inputs will not be surrounded by quotes (or vice versa; here we don’t want that, but DataLad caters for different situations).
To see what the expanded command would look like, without actually executing the command, we’ll use the --dry-run basic option (useful for more complex commands):
datalad run \
  --dry-run basic \
  -d . \
  -m "Create correlations plot" \
  -i inputs/adelie.csv \
  -i inputs/chinstrap.csv \
  -i inputs/gentoo.csv \
  -o figures/lmplot.png \
  "python process.py --data {inputs} --figure {outputs}"
 location: /home/alice/penguin-report
 expanded inputs:
  ['inputs/adelie.csv', 'inputs/chinstrap.csv', 'inputs/gentoo.csv']
 expanded outputs:
  ['figures/lmplot.png']
 command:
  python process.py --data {inputs} --figure {outputs}
 expanded command:
  python process.py --data inputs/adelie.csv inputs/chinstrap.csv inputs/gentoo.csv --figure figures/lmplot.png
Everything looks good, so let’s run for real:
datalad run \
  -d . \
  -m "Create correlations plot" \
  -i inputs/adelie.csv \
  -i inputs/chinstrap.csv \
  -i inputs/gentoo.csv \
  -o figures/lmplot.png \
  "python process.py --data {inputs} --figure {outputs}"
[INFO   ] Making sure inputs are available (this may take some time)
[INFO   ] == Command start (output follows) =====
[INFO   ] == Command exit (modification check follows) =====
add(ok): figures/lmplot.png (file)
save(ok): . (dataset)
This should produce a figure in figures/lmplot.png.
Take a look.
As expected, there is a remarkable correlation between flipper length and body mass, with the slope slightly different depending on the species.
Write the report
Once again we’ll use Markdown to write text.
Create a report.md file and put the following (or similar) contents inside:
# Penguins
## Introduction
Penguins have fascinated researchers since antiquity.
Nowadays, access to data on penguin size and foraging is easier than ever.
## Method
We analysed the Palmer penguins dataset.
## Results
There is a strong correlation between flipper length and body mass.

## Conclusion
This was not surprising.
Hint: if you are working in Jupyter Lab, you can right click the file and select Open With → Markdown Preview to see the rendered version.
Then, save your changes with:
datalad save -d . -m "Draft the report" report.md
add(ok): report.md (file)
save(ok): . (dataset)
Convert from Markdown to html for easier reading
To complete our use case, let’s convert the report to another format. We’ll use a program called pandoc, which can convert between multiple formats. Let’s select html as output (although PDF would be the most obvious choice, pandoc needs additional dependencies to make it).
datalad run -i report.md -o report.html "pandoc -s {inputs} -o {outputs}"
[INFO   ] Making sure inputs are available (this may take some time)
[INFO   ] == Command start (output follows) =====
[WARNING] This document format requires a nonempty <title> element.
  Defaulting to 'report' as the title.
  To specify a title, use 'title' in metadata or --metadata title="...".
[INFO   ] == Command exit (modification check follows) =====
add(ok): report.html (file)
save(ok): . (dataset)
The end! We have produced a nested dataset:
- the superdataset (penguin-report) directly contains our code, figures, and report (tracking their history), and includes inputs as a subdatset.
- the subdataset (inputs) tracks the history of the raw data files.
Key Points
A dataset can contain other datasets
The super- and sub-datasets have separate histories
The superdataset only contains a reference to a specific commit in the subdataset’s history
Extras: The Basics of Branching
Overview
Teaching: 60 min
Exercises: 0 minQuestions
What are branches, and why do you need them?
Objectives
Get an understanding of Git’s concept of a branch.
Create new branches in your dataset and switch between them.
Master the basics of a contribution workflow.
This is an extra lesson!
Unlike the main Episodes of this course, this lesson focuses less on purely DataLad-centric workflows, but conveys concepts of Git’s more advanced features. It aims to provide a more solid understanding of Git’s branches, why and when they are useful, and how to work with them productively. Because DataLad datasets are Git repositories, mastering the concept of branches will translate directly into DataLad workflows, for example collaboration. This can be helpful for the main episode on remote collaboration.
Prerequisites
This extra episode works best if you have worked through the episode Content Tracking with DataLad first, or if you already have created a DataLad dataset an made a few modifications.
What is a branch?
You already know that a dataset keeps a revision history of all past changes. Here is a short example with the development history of a dataset. Albeit minimal, it is a fairly stereotypical example of a revision history for a data analysis: Over time, one adds a script for data processing, and changes and fixes the pipeline until it is ready to compute the data. Then, the data are processed and saved, and once it’s published, one adds a DOI to the dataset README.

You can envision these changes like consecutive points on a timeline.

This timeline exists on a branch - a lightweight history streak of your dataset.
In this example here, the timeline exists on only a single branch, the default branch.
This default branch is usually called either main or master.
A basic branching workflow
Git doesn’t limit you to only a single timeline. Instead, it gives you the power to create as many timelines (branches) as you want, and those can co-exist in parallel. This allows you to make changes in different timelines, i.e., you can create “alternative realities”. For example, instead of keeping different flavours of preprocessing that you are yet undecided about in different folders, you could keep them within the same dataset, but on different branches:

Moreover, you have the power to travel across timelines, merge timelines or parts of them together, or add single events from one timeline to a different timeline. The only thing you need to master in order to do this is learn about common branching workflows.
The big bang: Dataset creation
Lets go back in time and see how the linear dataset history from above could have reached its latest state (added DOI to README) in a workflow that used more than one branch.
At the start of time stands the first commit on the default branch.
A datalad create is the big bang at the start of your multiverse that creates both the default branch and the first commit on it:
$ datalad create mydataset
|

|
The next major event in the young and yet single-verse is the addition of the processing script. Its probably one a past graduate student left on the lab server - finders-keepers.
$ datalad save -m \
|

|
Escape to a safe sandbox
The old script proves to be not as reusable as initially thought. It parameterizes the analysis really weirdly, and you’re not sure that you can actually run it on the data because it needs too much work. Nevertheless, let’s give it a try. But because you’re not sure if this endeavour works, let’s teleport to a new timeline - a branch that is independent from the default branch, yet still contains the script, allowing us to do some experimental changes without cluttering the main history line, for example changing the parametrization.
# create and enter a new branch
|

|
In theory, you can now continue the development in the alternative timeline until it is time to compute the results.
$ datalad save -m \
|

|
Merging timelines - I
When the results look good, you may deem the timeline you created worthy of “a merge” - getting integrated into the default branches’ timeline. How does it work? It involves jumps between branches: We switch to (checkout) the central branch and integrate (merge) the branch to get its changes.
# switch back to the default branch
|

|
This merge integrates all developments on the preproc branch into the main branch - the timelines were combined.
Merging timelines II
However, things could have gone slightly different. Lets rewind and consider a slight complexity: After you started working on tuning the processing pipeline, the old graduate student called. They apologized for the state of the script and urged to change the absolute paths to relative paths - else it would never run.
In a text-book-like branching workflow, such a change is integrated into the main line from a new dedicated branch.
The change needs to eventually be on the default branch because it is important, but there are different reasons why it wouldn’t be added to the main branch or the existing preproc branch:
In a picture-perfect branching workflow one ideally would never commit directly to the default branch.
The change also shouldn’t be added only to preproc - it is unclear whether that branches’ changes will be kept eventually, and other preprocessing flavours would need to have the fix as well.
Also, each branch should ideally be transparently dedicated only to a specific feature, for example tuning and performing the preprocessing.
Thus, in a text-book-like branching workflow, you commit the change on a new branch (fix-paths) that is then merged into main.
# create and enter a new branch
|

|
Merging timelines III
At this point, even though the fix to relative paths wasn’t added to the preproc branch dedicated to preprocessing, the fix is still crucial to run the script on the data.
So in order to get the fix (which is now a part of main) you can merge the changes from main into preproc.
# enter preproc
|

|
With fixes and tuning done, the data can be computed, preproc can be merged into main, and the development that does not need sandboxing (like adding a DOI badge to the README) could continue in the main branch.
$ datalad save -m "Compute results"
|

|
Keypoints
Branches are lightweight, independent history streaks of your dataset. Branches can contain less, more, or changed files compared to other branches, and one can merge the changes a branch contains into another branch. Branches can help with sandboxing and transparent development. While branching is a Git concept and is done with Git commands, it works in datasets (which are Git repositories under the hood) just as well.
And… what now?
Branching opens up the possibility to keep parallel developments neat and orderly next to each other, hidden away in branches. A checkout of your favourite branch lets you travel to its timeline and view all of the changes it contains, and a merge combines one or more timelines into another one.
Exercise
Take a brief break and enjoy one of the most well-made audio-visuals of the branching workflow. As an exercise, pay close attention to the git commands at the bottom of the video, and also the colorful branch and commit visualizations. Note how each instrument is limited to its branch until several branches are merged. Which concepts are new, which ones did you master already?
The true power in collaborative scenarios
While branching seems powerful, the end result of the timeline travelling performed above may be a bit underwhelming because what this process ends in is the very same timeline as when working on the very same branch. Just its visualization is slightly more complex:

The true power of this workflow is visible in collaborative scenarios. Imagine you’re not alone in this project - you teamed up with the grad student that wrote the script.
Setup for collaboration
Collaboration requires more than one dataset, or rather many copies (so called siblings) of the same dataset.
In a common collaborative workflow every involved collaborator has their own sibling of the dataset on their own computer.
Often, these datasets are siblings of one central dataset, which is commonly called upstream (though nothing enforces this convention - you could chose arbitrary names).
upstream is also the final destination where every collaborator sends their changes to, and typically lives on a Git repository hosting services such as GitHub, GitLab, Gin, or Bitbucket, because those services are usually accessible to every collaborator and provide a number of convenient collaborative features.
Names can be confusing
Collaborative workflows may be difficult not only because of the multidimensional nature of a dataset/repository with branches, but also because they involve a network-like setup of different repositories. The names for the network components can be confusing. Git and DataLad sometimes also use different names for the same concept. Here is an overview.
clone: A dataset/repository that was cloned from elsewhere.
sibling/remote: A dataset/repository (clone) that a given dataset/repository knows about. Siblings/remotes can be established automatically (e.g., acloneknows its original dataset), or added by hand. A sibling/remote always has a unique name (which can be arbitrary, and changed at will) and a path or URL to the dataset/repository. By default, the original dataset is known to its clones as the remote “origin”, i.e., whenever you clone a dataset/repository, the original location will be known as “origin” to your clone. The original dataset has no automatic knowledge about the clone, but you could add the clone as a remote by hand (viadatalad siblings add --name <name> --url <url>orgit remote add <name> <url>).
fork: A repository clone on a repository hosting site like GitHub. “Forking” a repository from a different user “clones” it into your own user account. This is necessary when you don’t have permissions to push any changes to the other user’s repository but still want to propose changes. It is not necessary when you are made a collaborator on the repository via the respective hosting service’s web interface.
upstreamversusorigin: Any clone knows its original dataset/repository as a remote. By default, this remote is called"origin". A dataset/repository often has multiple remotes, for example a different users’ dataset/repository on GitHub and your ownforkof this repository on GitHub. Ìt is convention (similarly to naming the default branchmainormaster) to call the original dataset on GitHubupstreamand your fork of itorigin. This involves adding a sibling/remote by hand and potentially renaming siblings/remotes (viagit remote rename <name> <newname>).

Let’s step through a scenario involving two computers and one shared repository on GitHub to which both collaborators have write access (i.e., a scenario without forks). For this setup, you travel back in time and, after adding the old processing script, you publish your dataset to GitHub.
# create a sibling repository named "mydataset" |

|
Afterwards, you invite the old graduate student to collaborate on the analysis. Repository hosting services allow you to add collaborators via their web interface - if they accept the invitation, they get write access. What they do next is obtain a clone from GitHub to their own laptop.
# get a clone from GitHub |

|
With every collaborator set up with a dataset to work on in parallel, you work on preprocessing tuning, while the old grad student fixes the issue with the absolute paths.
# Work on your sibling |

|
In order to propose the fix to the central dataset as an addition, the collaborator pushes their branch to the central sibling.
When the central sibling is on GitHub or a similar hosting service, the hosting service assists with merging fix-paths to main with a pull request - a browser-based description and overview of the changes a branch carries.
Collaborators can conveniently take a look and decide whether they accept the pull request and thereby merge the fix-paths into upstream’s main.
You can see how opening and merging PRs look like in GitHub’s interface in the expandable box below.
Creating a PR on GitHub
Once you pushed a new branch to GitHub it will suggest you to open a “pull request” (a request to merge your branch into the default branch)

You can write a title and a description of your changes:
When you created the pull request, your collaborators can see all changes on the branch and decide whether or not they want to merge them, or give feedback on necessary changes.
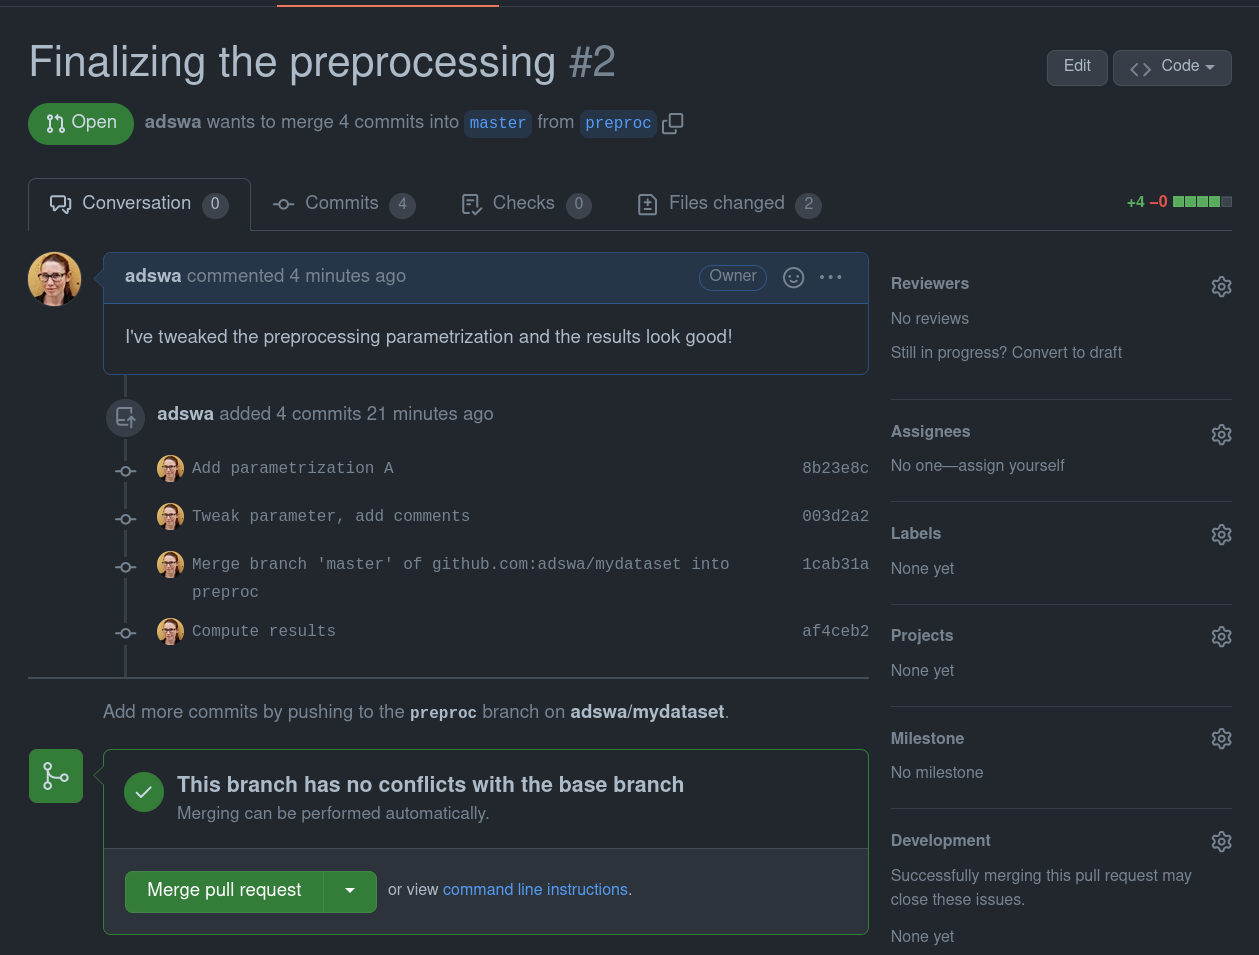
$ datalad push --to upstream |

|
Because those fixes are crucial to do the processing, you can now get them from the central sibling upstream - this time using git pull upstream main to merge the main branch of upstream into your local preproc branch.
# merge upstream's changes into your preproc branch |

|
Now that you have the crucial fix thanks to the parallel work of your collaborator, you can finally run the processing, and push your changes as well to propose them as a pull request to upstream:
$ datalad save -m "Compute results"
$ datalad push --to upstream
|

|
upstream’s default branch main now has a transparent and clean history with contributions from different collaborators. You can continue to make unobstructive changes to main, such as adding the DOI badge after publication of your fantastic results, but having used branches in the collaborative workflow before ensured that both changes could be developed in parallel, and integrated without hassle into main.
$ datalad save -m "Compute results"
$ datalad push --to upstream
|

|
When you take a look at the revision history now, even such a simple one, its timeline starts to hint at how multidimensional and collaborative branching can make your projects:
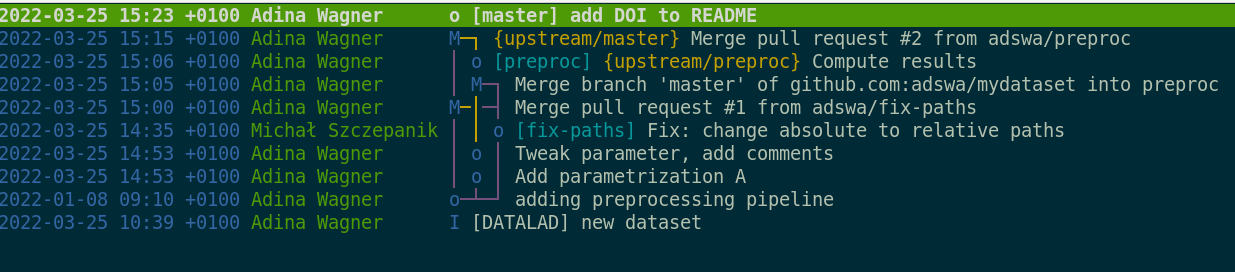
Further reading
Understanding and mastering branching keeps many people awake at night. It is a powerful concept, but it requires some time to generate the right mental model. Luckily, you will find hundreds of useful resources on the internet. Here, we’ll recommend two:
-
The first one is The Git Parable (20 min reading time). It is a story-like journey that not only explains the complex fundamental workings of Git, it also motivates them in an accessible way. As an added benefit, having read this text will make you friends with every open source software contributor at the next party - it works just like mentioning in passing that you have seen <insert-niche-Indie-band-here> in person to someone who has been a life-long fan.
-
The second one is the free, browser-based game learngitbranching.js.org. You will learn a lot of Git commands in passing, it’s at least as much fun and colors as Candy Crush, and the best use of time during boring Zoom seminars.
Key Points
Your dataset contains branches. The default branch is usually called either
mainormaster.There’s no limit to the number of branches one can have, and each branch can become an alternative timeline with developments independent from the developments in other branches.
Branches can be
mergedto integrate the changes from one branch into another.Using branches is fundamental in collaborative workflows where many collaborators start from a clean default branch and propose new changes to a central dataset sibling.
Typically, central datasets are hosted on services like GitHub, GitLab, or Gin, and if collaborators push their branches with new changes, these services help to create pull requests.
Extras: Removing datasets and files
Overview
Teaching: 15 min
Exercises: 0 minQuestions
How can I remove files or datasets?
Objectives
Learn how to remove dataset content
Remove unwanted datasets
This is an extra lesson!
Unlike the main Episodes of this course, this lesson focuses on only a specific set of commands independent of a larger storyline. It aims to provide a practical hands-on walk-through of removing annexed files or datasets and the different safety checks that can be in place to prevent data loss. A complete overview of file system operations, including renaming or moving files, is in handbook.datalad.org/basics/101-136-filesystem.html.
Prerequisites
This episode requires DataLad version
0.16or higher due to minor API changes indropandremovethat were introduced with0.16.
Drop and remove
Because we’re dealing with version control tools whose job it is to keep your data safe, normal file system operations to get rid of files will not yield the intended results with DataLad datasets.
If you were to run “rm” on a file or <right-click> - <delete> it, the file would still be in your dataset’s history. If you were to run rm -rf on a dataset or <right-click> - <delete> it, your screen would likely be swamped with permission denied errors.
This section specifically highlights how you can and can’t remove annexed contents or complete datasets using the commands datalad drop and datalad remove.
drop removes file contents from your local dataset annex, and remove wipes complete datasets from your system and does not leave a trace of them.
Even though these commands are potentially destructive, they can be useful in many use cases - drop is most useful to save disk space by removing file contents of currently or permanently unneeded files, and remove is most useful to get rid of a dataset that you do not need anymore.
drop the easy way: file content with verified remote availability
By default, both commands make sure that you wouldn’t loose any data when they are run.
To demonstrate dropping file content, let’s start by cloning a public dataset with a few small-ish (less than 80MB in total) files.
This dataset is a collection of machine-learning books and available from GitHub with the following clone command:
# make sure to run this command outside of any existing dataset
datalad clone https://github.com/datalad-datasets/machinelearning-books.git
The PDFs in this dataset are all annexed contents, and can be retrieved using datalad get:
cd machinelearning-books
datalad get A.Shashua-Introduction_to_Machine_Learning.pdf
Once you have obtained one file’s contents, they are known to exist in their remote registered location and locally on your system:
git annex whereis A.Shashua-Introduction_to_Machine_Learning.pdf
whereis A.Shashua-Introduction_to_Machine_Learning.pdf (2 copies)
  	00000000-0000-0000-0000-000000000001 -- web
   	0d757ca9-ea20-4646-96cb-19dccd732f8c -- adina@muninn:/tmp/machinelearning-books [here]

  web: https://arxiv.org/pdf/0904.3664v1.pdf
ok
This output shows that the file contents of this book exist locally and “on the web”, more precisely under the URL arxiv.org/pdf/0904.3664v1.pdf.
A datalad drop <file> performs an internal check if the to-be-dropped file content could be re-obtained before dropping it.
When the file content exists in more locations than your local system, and at least one of those other location is successfully probed to have this content, dropping its file content succeeds.
Here is a successful drop:
datalad drop A.Shashua-Introduction_to_Machine_Learning.pdf
drop(ok): A.Shashua-Introduction_to_Machine_Learning.pdf (file)
remove the easy way: datasets with remote availability
To demonstrate removing datasets, let’s remove the machinelearning-books dataset.
Because this dataset was cloned from a GitHub repository, it has a registered sibling:
datalad siblings
.: here(+) [git]
.: origin(-) [https://github.com/datalad-datasets/machinelearning-books.git (git)]
remove performs an internal check whether all changes in the local dataset would also be available from a known sibling.
If the dataset has a sibling and this sibling has all commits that the local dataset has, too, remove succeeds.
Note that remove needs to be called from outside of the to-be-removed dataset, it can not “pull the rug from underneath its own feet”.
Make sure to use -d/--dataset to point to the correct dataset:
cd ../
datalad remove -d machinelearning-books
uninstall(ok): . (dataset)
drop with disabled availability checks
When drop’s check for continued file content availability from other locations fails, the drop command will fail, too.
To demonstrate this, let’s create a new dataset, add a file into it, and save it.
datalad create local-dataset
cd local-dataset
echo "This file content will only exist locally" > local-file.txt
datalad save -m "Added a file without remote content availability"
Verify that its content only has 1 copy, and that it is only available from the local dataset:
git annex whereis local-file.txt
whereis local-file.txt (1 copy)
  	0d757ca9-ea20-4646-96cb-19dccd732f8c -- adina@muninn:/tmp/local-dataset [here]
ok
Running datalad drop will fail now:
datalad drop local-file.txt
drop(error): local-file.txt (file) [unsafe; Could only verify the existence of 0 out of 1 necessary copy; (Note that these git remotes have annex-ignore set: origin upstream); (Use --reckless availability to override this check, or adjust numcopies.)]
Impeded file availability despite multiple registered sources
The check for continued file content availability from other locations could fail when there is no other location registered, but also if the registered location is currently unavailable - for example because you disabled your internet connection, because the webserver hosting your contents is offline for maintenance, or because the registered location belongs to an external hard drive that is currently not plugged in.
The error message drop displays hints at two ways to drop the file content even though no other available copy could be verified: Via a git-annex configuration (“adjust numcopies”, which is by default set to ensure at least 1 other copy) or via DataLad’s --reckless parameter.
The --reckless parameter has multiple modes. Each mode is one type of safety check. Because it is the “availability” check fails, --reckless availability will disable it:
datalad drop local-file.txt --reckless availability
The file content of local-file.txt is irretrievably gone now.
Dropping multiple versions of a file
If a file has been updated and saved multiple times, the revision history of the dataset will have each version in the annex, and only the most recent versions’ content would be dropped. Consider the following example:
  datalad run -m "Make a first version" --output local-file-multiple-revision.txt "echo 'This is the first revision' > {outputs}"
  # overwrite the contents of the file
  datalad run -m "Make a second version" --output local-file-multiple-revision.txt "echo 'This is the second revision' > {outputs}"
datalad drop --reckless availability local-file-multiple-revision.txtwould drop the current revision of the file, but the first version (with the content “This is the first revision”) would still exist in the dataset’s history. To verify this,git checkoutthe first run commit and check the contents of the file.git checkout HEAD~1 cat local-file-multiple-revision.txt # outputs "This is the first revision" git checkout main # or master, depending on your default branchIn order to remove all past versions of this file, too, you can run
git annex unusedto find unused data, andgit annex dropunused(potentially with a--forceflag) to drop it:git annex unused unused . (checking for unused data...) (checking origin/HEAD...) (checking update-book-2...) (checking update-book...) (checking main...) Some annexed data is no longer used by any files: NUMBER KEY 1 MD5E-s27--f90c649b1fe585564eb5cdfdd16ec345.txt (To see where this data was previously used, run: git annex whereused --historical --unused To remove unwanted data: git-annex dropunused NUMBER ok
remove with disabled availability checks
When remove’s check to ensure the availability of the dataset and all its revisions in a known sibling fails - either because there is no known sibling, or because the local dataset has branches or commits that are not available at that sibling, remove will fail.
This is the case for the local-dataset:
cd ../
datalad remove -d local-dataset
uninstall(error): . (dataset) [to-be-dropped dataset has revisions that are not available at any known sibling. Use `datalad push --to ...` to push these before dropping the local dataset, or ignore via `--reckless availability`. Unique revisions: ['main']]
remove advises to either push the “unique revisions” to a different place (i.e., creating a sibling to host your pristine, version-controlled changes), or, similarly to how it was done for drop, to disable the availability check with --reckless availability.
datalad remove -d local-dataset --reckless availability
uninstall(ok): . (dataset)
remove gone wrong - how to fix an accidental rm -rf
Removing datasets without datalad remove is a bad idea - for one, because it skips safety checks that aim to prevent data loss, and secondly, because it doesn’t work so well.
If you were to remove a dataset using common Unix commands such as rm -rf or your operating systems’ file browser, you would see the residue of write-protected annexed files refusing to be deleted.
On the command line, it would look something like this:
cannot remove 'machinelearning-books/.git/annex/objects/zw/WF/URL-s1787416--http&c%%www1.maths.leeds.ac.uk%,126charles%statlog%whole.pdf/URL-s1787416--http&c%%www1.maths.leeds.ac.uk%,126charles%statlog%whole.pdf': Permission denied
rm: cannot remove 'machinelearning-books/.git/annex/objects/jQ/GM/MD5E-s21322662--8689c3c26c3a1ceb60c1ba995d638677.pdf/MD5E-s21322662--8689c3c26c3a1ceb60c1ba995d638677.pdf': Permission denied
[...]
Afterwards, a few left-over but unusable dataset ruins remain. To remove those from your system, you need to make the remaining files writable:
# add write permissions to the directory
chmod -R +w <dataset>
# remove everything that is left
rm -rf <dataset>
Further reading
This overview only covers the surface of all possible file system operations, and not even all ways in which files or datasets can be removed. For a more complete overview, check out handbook.datalad.org/basics/101-136-filesystem.html - the navigation bar on the left of the page lists a number of useful file system operations.
Key Points
Your dataset keeps annexed data safe and will refuse to perform operations that could cause data loss
Removing files or datasets with known copies is easy, removing files or datasets without known copies requires by-passing security checks
There are two ‘destructive’ commands:
dropandremove
dropis the antagonist command toget, andremoveis the antagonist command tocloneBoth commands have a
--reckless [MODE]parameter to override safety checks