Extras: The Basics of Branching
Overview
Teaching: 60 min
Exercises: 0 minQuestions
What are branches, and why do you need them?
Objectives
Get an understanding of Git’s concept of a branch.
Create new branches in your dataset and switch between them.
Master the basics of a contribution workflow.
This is an extra lesson!
Unlike the main Episodes of this course, this lesson focuses less on purely DataLad-centric workflows, but conveys concepts of Git’s more advanced features. It aims to provide a more solid understanding of Git’s branches, why and when they are useful, and how to work with them productively. Because DataLad datasets are Git repositories, mastering the concept of branches will translate directly into DataLad workflows, for example collaboration. This can be helpful for the main episode on remote collaboration.
Prerequisites
This extra episode works best if you have worked through the episode Content Tracking with DataLad first, or if you already have created a DataLad dataset an made a few modifications.
What is a branch?
You already know that a dataset keeps a revision history of all past changes. Here is a short example with the development history of a dataset. Albeit minimal, it is a fairly stereotypical example of a revision history for a data analysis: Over time, one adds a script for data processing, and changes and fixes the pipeline until it is ready to compute the data. Then, the data are processed and saved, and once it’s published, one adds a DOI to the dataset README.

You can envision these changes like consecutive points on a timeline.

This timeline exists on a branch - a lightweight history streak of your dataset.
In this example here, the timeline exists on only a single branch, the default branch.
This default branch is usually called either main or master.
A basic branching workflow
Git doesn’t limit you to only a single timeline. Instead, it gives you the power to create as many timelines (branches) as you want, and those can co-exist in parallel. This allows you to make changes in different timelines, i.e., you can create “alternative realities”. For example, instead of keeping different flavours of preprocessing that you are yet undecided about in different folders, you could keep them within the same dataset, but on different branches:

Moreover, you have the power to travel across timelines, merge timelines or parts of them together, or add single events from one timeline to a different timeline. The only thing you need to master in order to do this is learn about common branching workflows.
The big bang: Dataset creation
Lets go back in time and see how the linear dataset history from above could have reached its latest state (added DOI to README) in a workflow that used more than one branch.
At the start of time stands the first commit on the default branch.
A datalad create is the big bang at the start of your multiverse that creates both the default branch and the first commit on it:
$ datalad create mydataset
|

|
The next major event in the young and yet single-verse is the addition of the processing script. Its probably one a past graduate student left on the lab server - finders-keepers.
$ datalad save -m \
|

|
Escape to a safe sandbox
The old script proves to be not as reusable as initially thought. It parameterizes the analysis really weirdly, and you’re not sure that you can actually run it on the data because it needs too much work. Nevertheless, let’s give it a try. But because you’re not sure if this endeavour works, let’s teleport to a new timeline - a branch that is independent from the default branch, yet still contains the script, allowing us to do some experimental changes without cluttering the main history line, for example changing the parametrization.
# create and enter a new branch
|

|
In theory, you can now continue the development in the alternative timeline until it is time to compute the results.
$ datalad save -m \
|

|
Merging timelines - I
When the results look good, you may deem the timeline you created worthy of “a merge” - getting integrated into the default branches’ timeline. How does it work? It involves jumps between branches: We switch to (checkout) the central branch and integrate (merge) the branch to get its changes.
# switch back to the default branch
|

|
This merge integrates all developments on the preproc branch into the main branch - the timelines were combined.
Merging timelines II
However, things could have gone slightly different. Lets rewind and consider a slight complexity: After you started working on tuning the processing pipeline, the old graduate student called. They apologized for the state of the script and urged to change the absolute paths to relative paths - else it would never run.
In a text-book-like branching workflow, such a change is integrated into the main line from a new dedicated branch.
The change needs to eventually be on the default branch because it is important, but there are different reasons why it wouldn’t be added to the main branch or the existing preproc branch:
In a picture-perfect branching workflow one ideally would never commit directly to the default branch.
The change also shouldn’t be added only to preproc - it is unclear whether that branches’ changes will be kept eventually, and other preprocessing flavours would need to have the fix as well.
Also, each branch should ideally be transparently dedicated only to a specific feature, for example tuning and performing the preprocessing.
Thus, in a text-book-like branching workflow, you commit the change on a new branch (fix-paths) that is then merged into main.
# create and enter a new branch
|

|
Merging timelines III
At this point, even though the fix to relative paths wasn’t added to the preproc branch dedicated to preprocessing, the fix is still crucial to run the script on the data.
So in order to get the fix (which is now a part of main) you can merge the changes from main into preproc.
# enter preproc
|

|
With fixes and tuning done, the data can be computed, preproc can be merged into main, and the development that does not need sandboxing (like adding a DOI badge to the README) could continue in the main branch.
$ datalad save -m "Compute results"
|

|
Keypoints
Branches are lightweight, independent history streaks of your dataset. Branches can contain less, more, or changed files compared to other branches, and one can merge the changes a branch contains into another branch. Branches can help with sandboxing and transparent development. While branching is a Git concept and is done with Git commands, it works in datasets (which are Git repositories under the hood) just as well.
And… what now?
Branching opens up the possibility to keep parallel developments neat and orderly next to each other, hidden away in branches. A checkout of your favourite branch lets you travel to its timeline and view all of the changes it contains, and a merge combines one or more timelines into another one.
Exercise
Take a brief break and enjoy one of the most well-made audio-visuals of the branching workflow. As an exercise, pay close attention to the git commands at the bottom of the video, and also the colorful branch and commit visualizations. Note how each instrument is limited to its branch until several branches are merged. Which concepts are new, which ones did you master already?
The true power in collaborative scenarios
While branching seems powerful, the end result of the timeline travelling performed above may be a bit underwhelming because what this process ends in is the very same timeline as when working on the very same branch. Just its visualization is slightly more complex:

The true power of this workflow is visible in collaborative scenarios. Imagine you’re not alone in this project - you teamed up with the grad student that wrote the script.
Setup for collaboration
Collaboration requires more than one dataset, or rather many copies (so called siblings) of the same dataset.
In a common collaborative workflow every involved collaborator has their own sibling of the dataset on their own computer.
Often, these datasets are siblings of one central dataset, which is commonly called upstream (though nothing enforces this convention - you could chose arbitrary names).
upstream is also the final destination where every collaborator sends their changes to, and typically lives on a Git repository hosting services such as GitHub, GitLab, Gin, or Bitbucket, because those services are usually accessible to every collaborator and provide a number of convenient collaborative features.
Names can be confusing
Collaborative workflows may be difficult not only because of the multidimensional nature of a dataset/repository with branches, but also because they involve a network-like setup of different repositories. The names for the network components can be confusing. Git and DataLad sometimes also use different names for the same concept. Here is an overview.
clone: A dataset/repository that was cloned from elsewhere.
sibling/remote: A dataset/repository (clone) that a given dataset/repository knows about. Siblings/remotes can be established automatically (e.g., acloneknows its original dataset), or added by hand. A sibling/remote always has a unique name (which can be arbitrary, and changed at will) and a path or URL to the dataset/repository. By default, the original dataset is known to its clones as the remote “origin”, i.e., whenever you clone a dataset/repository, the original location will be known as “origin” to your clone. The original dataset has no automatic knowledge about the clone, but you could add the clone as a remote by hand (viadatalad siblings add --name <name> --url <url>orgit remote add <name> <url>).
fork: A repository clone on a repository hosting site like GitHub. “Forking” a repository from a different user “clones” it into your own user account. This is necessary when you don’t have permissions to push any changes to the other user’s repository but still want to propose changes. It is not necessary when you are made a collaborator on the repository via the respective hosting service’s web interface.
upstreamversusorigin: Any clone knows its original dataset/repository as a remote. By default, this remote is called"origin". A dataset/repository often has multiple remotes, for example a different users’ dataset/repository on GitHub and your ownforkof this repository on GitHub. Ìt is convention (similarly to naming the default branchmainormaster) to call the original dataset on GitHubupstreamand your fork of itorigin. This involves adding a sibling/remote by hand and potentially renaming siblings/remotes (viagit remote rename <name> <newname>).

Let’s step through a scenario involving two computers and one shared repository on GitHub to which both collaborators have write access (i.e., a scenario without forks). For this setup, you travel back in time and, after adding the old processing script, you publish your dataset to GitHub.
# create a sibling repository named "mydataset" |

|
Afterwards, you invite the old graduate student to collaborate on the analysis. Repository hosting services allow you to add collaborators via their web interface - if they accept the invitation, they get write access. What they do next is obtain a clone from GitHub to their own laptop.
# get a clone from GitHub |

|
With every collaborator set up with a dataset to work on in parallel, you work on preprocessing tuning, while the old grad student fixes the issue with the absolute paths.
# Work on your sibling |

|
In order to propose the fix to the central dataset as an addition, the collaborator pushes their branch to the central sibling.
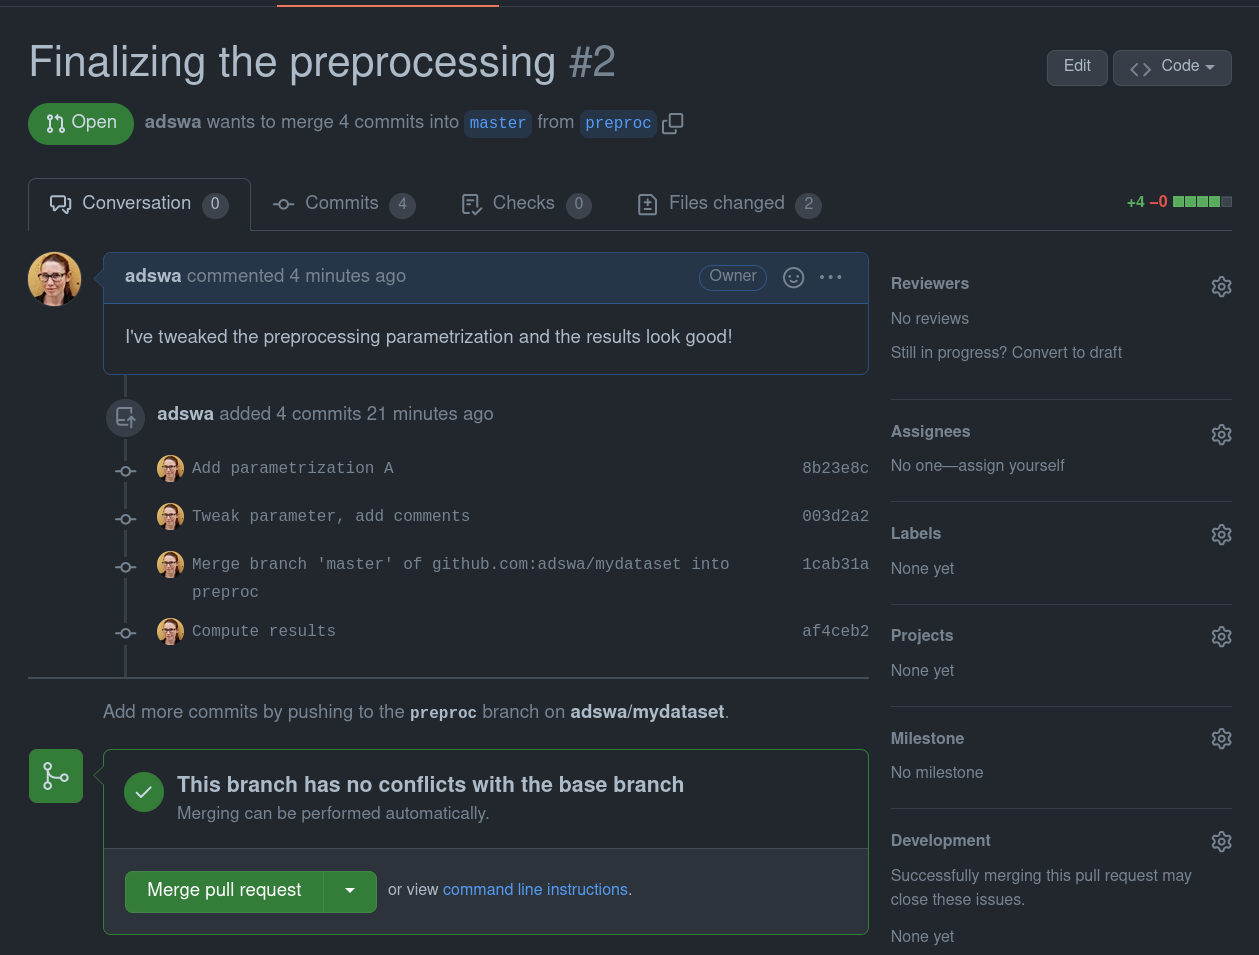
When the central sibling is on GitHub or a similar hosting service, the hosting service assists with merging fix-paths to main with a pull request - a browser-based description and overview of the changes a branch carries.
Collaborators can conveniently take a look and decide whether they accept the pull request and thereby merge the fix-paths into upstream’s main.
You can see how opening and merging PRs look like in GitHub’s interface in the expandable box below.
Creating a PR on GitHub
Once you pushed a new branch to GitHub it will suggest you to open a “pull request” (a request to merge your branch into the default branch)

You can write a title and a description of your changes:
When you created the pull request, your collaborators can see all changes on the branch and decide whether or not they want to merge them, or give feedback on necessary changes.
$ datalad push --to upstream |

|
Because those fixes are crucial to do the processing, you can now get them from the central sibling upstream - this time using git pull upstream main to merge the main branch of upstream into your local preproc branch.
# merge upstream's changes into your preproc branch |

|
Now that you have the crucial fix thanks to the parallel work of your collaborator, you can finally run the processing, and push your changes as well to propose them as a pull request to upstream:
$ datalad save -m "Compute results"
$ datalad push --to upstream
|

|
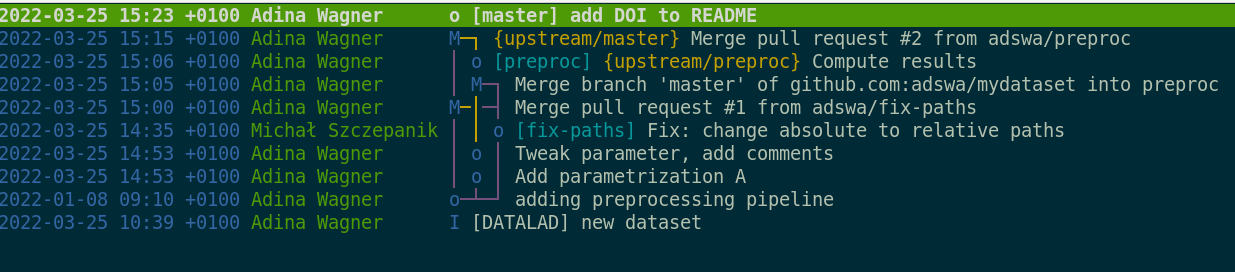
upstream’s default branch main now has a transparent and clean history with contributions from different collaborators. You can continue to make unobstructive changes to main, such as adding the DOI badge after publication of your fantastic results, but having used branches in the collaborative workflow before ensured that both changes could be developed in parallel, and integrated without hassle into main.
$ datalad save -m "Compute results"
$ datalad push --to upstream
|

|
When you take a look at the revision history now, even such a simple one, its timeline starts to hint at how multidimensional and collaborative branching can make your projects:
Further reading
Understanding and mastering branching keeps many people awake at night. It is a powerful concept, but it requires some time to generate the right mental model. Luckily, you will find hundreds of useful resources on the internet. Here, we’ll recommend two:
-
The first one is The Git Parable (20 min reading time). It is a story-like journey that not only explains the complex fundamental workings of Git, it also motivates them in an accessible way. As an added benefit, having read this text will make you friends with every open source software contributor at the next party - it works just like mentioning in passing that you have seen <insert-niche-Indie-band-here> in person to someone who has been a life-long fan.
-
The second one is the free, browser-based game learngitbranching.js.org. You will learn a lot of Git commands in passing, it’s at least as much fun and colors as Candy Crush, and the best use of time during boring Zoom seminars.
Key Points
Your dataset contains branches. The default branch is usually called either
mainormaster.There’s no limit to the number of branches one can have, and each branch can become an alternative timeline with developments independent from the developments in other branches.
Branches can be
mergedto integrate the changes from one branch into another.Using branches is fundamental in collaborative workflows where many collaborators start from a clean default branch and propose new changes to a central dataset sibling.
Typically, central datasets are hosted on services like GitHub, GitLab, or Gin, and if collaborators push their branches with new changes, these services help to create pull requests.